Est. reading time: 6 minutes

Dedicated Servers
High-performance, bare-metal, dedicated servers with root, IPMI and RMM access.
Container VPS Hosting
Virtual servers give you the dedicated server experience affordably.
Linux Virtual Machines
Cloud-based Linux virtual machines powered by KVM.
Windows Cloud Servers
Windows virtual server hosting within the cloud for fast reliable connectivity.
Managed cPanel Servers
Managed cPanel cloud server hosting with priority support and daily backups.
Managed Colocation New!
Secure hosting for your critical infrastructure.
Accounting Software Hosting New!
Efficient, cloud-based hosting for accounting software.
Web Hosting
Take your idea or business online today with our shared web hosting solutions.
Email Hosting
Let your customers know they are dealing with a legitimate business by using a custom email address.
Site Builder
Build your own website online with our easy drag and drop website builder.
LiteSpeed Hosting
Accelerated LiteSpeed hosting with improved performance for your website, blog or online shop.
WordPress Hosting
Build your WordPress website with thousands of plugins and themes to choose from.
Register a domain
Search for and register your domain today.
Transfer your domain
Transfer your existing domain to us.
Domain prices
View prices for all domain registrations, renewals and transfers.
WHOIS Lookup
Lookup every single domain currently registered in the world.
VPS Reseller
Becoming a VPS reseller is a great way to earn money.
Reseller Web Hosting (WHM)
A great way to earn money and build your own web hosting company.
LiteSpeed Hosting Reseller
Advanced server-side caching to accelerate your LiteSpeed enabled websites
Domain Resellers
Resell Domains and profit from our large reseller rebates.
Acronis Online Backup Reseller
Become an Acronis online backup reseller to maximize your revenue.
Login
Log in to your personal HOSTAFRICA account
Register
Don't have an account yet ? Create a new one
Forgot Password?
Recover your account password
Move to HOSTAFRICA
Free cPanel to cPanel and domain name transfers with any new plan!
Announcements
All the latest from HOSTAFRICA
Knowledgebase
Browse our knowledge base to get help immediately.
Network Status
Network issues & scheduled maintenances
Contact us
Need other help with your HOSTAFRICA account?
Blog
Find our latest news, guides and tutorials here.
Docker is an open-source software solution that enables developers to build, deploy, and run applications in self-sufficient containers. The solution comprises of portable container images with all the resources the applications will need to run efficiently.
Advantages of Docker include lower overheads and better usage of resources. Also, it overcomes various compatibility issues that developers and sysadmins encounter when deploying and managing applications on different computer systems. As long as Docker is installed, you can run all the supported images on the computer or server regardless of its hardware or software.
You will learn how to install a package from the official Docker repository which provides the latest stable versions. For all the installations, the files are available from Docker official servers, Ubuntu servers, and other locations. However, only the official repository will have the latest stable versions at any one time. So the best practice, unless unavoidable, is to install from this location.
In this section, you will learn how to install Docker on Ubuntu 19.10 which is like the process for Ubuntu 18.04. The steps should work for other versions but there could be a few variations.
Prerequisites
sudo userWe start by updating the local databases. Open the command prompt and run
sudo apt-get update
This command installs dependencies to ensure that apt command transfers files securely over https.
sudo apt install apt-transport-https ca-certificates curl software-properties-common
This is a security feature to ensure the authenticity of the installation files.
curl -fsSL https://download.docker.com/linux/ubuntu/gpg | sudo apt-key add -

Add the Docker repository to apt sources using the command
sudo add-apt-repository "deb [arch=amd64] https://download.docker.com/linux/ubuntu bionic stable"
Use the command below to update the repositories just added in the previous command
sudo apt-get update
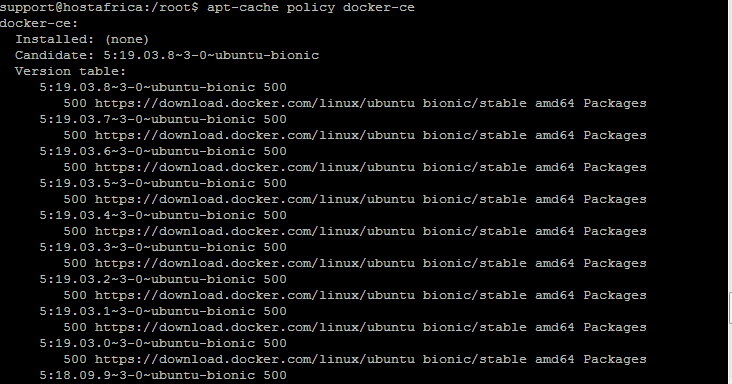
You may want to confirm that you are running the installation from the Docker official repository using the command;
apt-cache policy docker-ce
If correct, you will see the following output
Use the command below to install the latest version of Docker.
sudo apt-get install docker-ce
The command installs the latest Docker, after which it starts the daemon and configures it to load automatically when the machine boots. Type Y and press Enter when prompted.

After it completes the process, use the command below to verify that the Docker installation is successful, active and running.
sudo systemctl status docker
This will give an output as below

The output shows that Docker service is loaded and active, hence indicating a successful installation.
We have used the above steps to successfully install Docker on Ubuntu 18.04 as well as Ubuntu 19.10.
In this section, you will learn how to install Docker on CentOS 8.
Prerequisites
Sudo accountLet us start by upgrading the package database
sudo yum update
Type Y for yes if prompted to download package updates
Once the update is complete, we will add the Docker repository and install Docker
sudo dnf config-manager --add-repo=https://download.docker.com/linux/centos/docker-ce.repo
The CentOS 8 does not work with some versions of container.id and gives errors when installing with the default package.
There are two ways of overcoming this challenge:
1. Install Docker while skipping unstable dependencies
Or
2. Manually add the stable version of supported dependencies package.
Option 1 is to install Docker while automatically skipping packages that have broken dependencies and using the versions that meet certain specifications. To do this we will use the --nobest command
The command allows CentOS to install the Docker version or release meeting certain specifications. If the latest version has broken dependency, such as the containerd.io package, the CentOS will pick the previous stable Docker release.
To do this, use the command
sudo dnf install docker-ce --nobest
The system will scan the packages and dependencies and give you a list of what it will install. It will also show the packages it will skip due to broken dependencies.
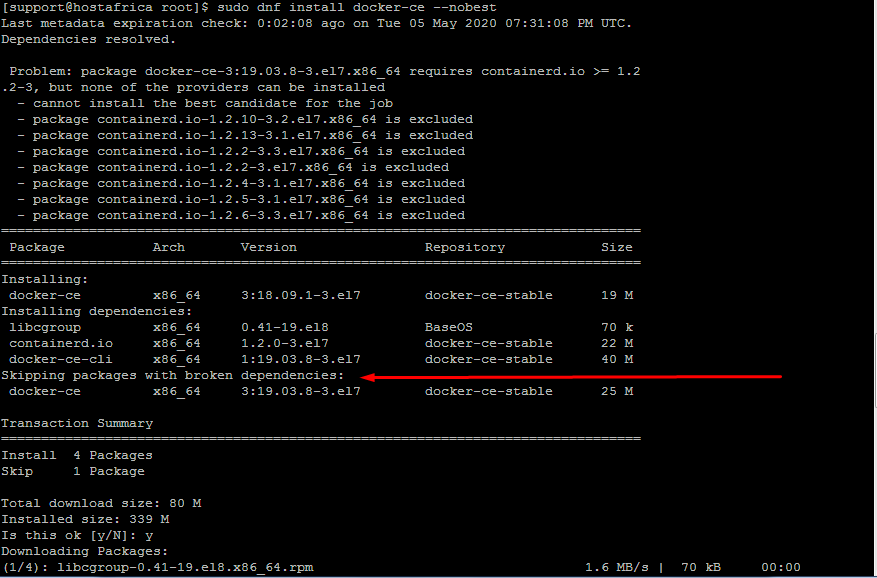
Type Y when prompted.
This will skip the latest unstable package and use a previous stable version.

From above, it shows that the installed Docker version is docker-ce-3:18.09.1-3.el7.x86_64.
Also, the second arrow shows that CentOS skipped the latest Docker version docker-ce-3:19.03.8-3.el7.x86_64
This method allows you to install the latest Docker but requires adding the stable container.id package manually.
To add the stable container.id, run
sudo dnf install https://download.docker.com/linux/centos/7/x86_64/stable/Packages/containerd.io-1.2.10-3.2.el7.x86_64.rpm
Once the container.id is in place, you can now install Docker with the following command.
sudo dnf install docker-ce -y

As can be seen, this method has installed the latest Docker version docker-ce-3:19.03.8-3.el7.x86_64
You will now enable and start Docker using the command.
sudo systemctl enable --now docker
To confirm that Docker is active and running use
systemctl status docker
In this section, we will use the Docker official repository to install the latest version on Debian 10. This guide works for Debian 9 too.
Prerequisites
sudo userOur first step is to update the list of packages installed on Debian.
sudo apt update
We will now install the files required to ensure that the apt will only use the https connections to transfer files to and from other computers.
sudo apt install apt-transport-https ca-certificates curl gnupg2 software-properties-common
The GPG key ensures that we only obtain authentic files from the repository. To add the key, run the command below. This will return an OK.
curl -fsSL https://download.docker.com/linux/debian/gpg | sudo apt-key add -
sudo add-apt-repository "deb [arch=amd64] https://download.docker.com/linux/debian $(lsb_release -cs) stable"
Add the just installed Docker packages to the packages database using the following command
sudo apt update
To install Docker now, run;
sudo apt install docker-ce
Type Y and press enter to continue with the installation when prompted to do so.
The above command will install the Docker on Debian after which it configures its engine to start on boot.
Use the command below to check the status and find out if the installation was successful, active, and running.
sudo systemctl status docker
Output

The Windows Server 2016 requires the Docker enterprise edition. The instructions below will also work on Windows Server 2019.
Prerequisites
In this section, you will learn how to install Docker on Windows Server 2016
Once you log in as an administrator, you will get a Windows command prompt PS C:\Users\Administrator>
At the prompt, type the following command
install-module -name DockerMsftProvider -Force
The command will appear as;
PS C:\Users\Administrator> install-module -name DockerMsftProvider -Force
This will return the following output with a prompt to type Y or N.

Type Y to proceed to install and import the NuGet provider. The computer will go back to the command prompt after a short time.
Type the following command at the prompt.
PS C:\Users\Administrator>Install-Package Docker -Providername DockerMsftProvider -Force
The command will install the Docker package. If successful, you will see a warning message that requests you to restart the computer.

Type the Restart-Computer command at the prompt.
PS C:\Users\Administrator>Restart-Computer
Once the computer restarts, use the following command to verify 1. that Docker is installed successfully and 2. its version.
PS C:\Users\Administrator>docker version


Learn how to install Tailscale VPN on Linux and Windows. This comprehensive guide has everything you need to get started!

Learn how to install Kubernetes and deploy a cluster with Docker on Debian 9. Step by step instructions with commands and images.

Learn how to install Kubernetes and deploy a cluster on a Windows server. Step by step instructions with commands and images.