Est. reading time: 7 minutes

Dedicated Servers
High-performance, bare-metal, dedicated servers with root, IPMI and RMM access.
Container VPS Hosting
Virtual servers give you the dedicated server experience affordably.
Linux Virtual Machines
Cloud-based Linux virtual machines powered by KVM.
Windows Cloud Servers
Windows virtual server hosting within the cloud for fast reliable connectivity.
Managed cPanel Servers
Managed cPanel cloud server hosting with priority support and daily backups.
Managed Colocation New!
Secure hosting for your critical infrastructure.
Accounting Software Hosting New!
Efficient, cloud-based hosting for accounting software.
Web Hosting
Take your idea or business online today with our shared web hosting solutions.
Email Hosting
Let your customers know they are dealing with a legitimate business by using a custom email address.
Site Builder
Build your own website online with our easy drag and drop website builder.
LiteSpeed Hosting
Accelerated LiteSpeed hosting with improved performance for your website, blog or online shop.
WordPress Hosting
Build your WordPress website with thousands of plugins and themes to choose from.
Register a domain
Search for and register your domain today.
Transfer your domain
Transfer your existing domain to us.
Domain prices
View prices for all domain registrations, renewals and transfers.
WHOIS Lookup
Lookup every single domain currently registered in the world.
VPS Reseller
Becoming a VPS reseller is a great way to earn money.
Reseller Web Hosting (WHM)
A great way to earn money and build your own web hosting company.
LiteSpeed Hosting Reseller
Advanced server-side caching to accelerate your LiteSpeed enabled websites
Domain Resellers
Resell Domains and profit from our large reseller rebates.
Acronis Online Backup Reseller
Become an Acronis online backup reseller to maximize your revenue.
Login
Log in to your personal HOSTAFRICA account
Register
Don't have an account yet ? Create a new one
Forgot Password?
Recover your account password
Move to HOSTAFRICA
Free cPanel to cPanel and domain name transfers with any new plan!
Announcements
All the latest from HOSTAFRICA
Knowledgebase
Browse our knowledge base to get help immediately.
Network Status
Network issues & scheduled maintenances
Contact us
Need other help with your HOSTAFRICA account?
Blog
Find our latest news, guides and tutorials here.
Navigating your way around cPanel can be a bit tricky if you’re new to hosting or aren’t familiar with the interface. Not to worry, we’ll show you how to install your SSL certificate in cPanel.
Fortunately for you, we’ve gone through the steps just as a beginner would, so we’ll be guiding you throughout the entire process. We’ve also taken the liberty of showing you where you can purchase SSL certificates on our website, if you prefer WHMCS (your client zone) instead of cPanel.
We’ve split the guide into two sections for those who haven’t yet bought an SSL and those who have.
Forthwith onto the guide!
If you haven’t locked up the address bar of your website, you may not need to purchase an SSL certificate just yet, depending on the type of ship you’re running.
Assuming you’re a patron of ours, you can rest easy knowing that we’ve got AutoSSL enabled in cPanel for you. If your website is hosted somewhere else, check if your host has done the same. If your host hasn't enabled AutoSSL, then this section doesn’t apply to you.
This means if you’re a client of HOSTAFRICA or of a host that has AutoSSL, you can get a free Domain Validated (DV) SSL. Which of course means you may not need to buy an SSL certificate at all.
Let’s say you have a single domain, cPanel will auto-install a free DV Single Domain SSL for you. If you have a single domain with several sub-domains, cPanel will auto-install a DV Wildcard SSL on all subdomains.
There’s no limit on the number of domains and sub-domains that can benefit from AutoSSL on our nameservers. So, all your websites can function as safely as you need them to be – standard security procedure here at HOSTAFRICA.
It’s important to note that Domain Validation is the lowest form of validation. This is perfectly fine for blogs, and small websites etc.
However, if you’re a reputable business website that handles online transactions and wants more trustworthiness, then a paid SSL might be better, because they include a warranty.
Note: that AutoSSL doesn’t provide insurance/warranty like paid SSLs. Just a snippet on this:
As with any material object that has a warranty, you can expect some sort of reparation. Whether that’s replacing the broken object or offering a refund. Some SSL certificates also offer warranties, but in a slightly different way.

Paid SSLs insure end-users (website visitors) should they lose money to fraudulent transactions. This is because the CA was supposed to validate the legitimacy of the businesses, and not issue an SSL to a fraudulent site.
This gives users piece of mind, so they’re more likely to make transactions. With that said, the bigger the warranty, the more confident the SSL certificate provider is in their validation. This is why paid SSLs are seen as more trustworthy.
If you’d prefer buying and installing one of our paid SSLs, skip ahead to the section: Buy an SSL certificate in WHMCS.
So, to check if you’ve got AutoSSL, log in to your cPanel using any of the following methods:
Option 1: Use the cpanel sub-domain prepended to your domain. i.e cpanel.yourwebsite.com

Option 2: Use cPanel’s port (:) 2083 appended to your domain or IP address i.e. yourwebsite.com:2083 or 123.234.123.234:2083

Both should take you to cPanel’s browser login page:

Option 3: Through your WHMCS Client Area: Log in to your Client Area, select the relevant Product/Service.

Under the Actions panel on the left-hand side, click Login to cPanel.

Now, from the cPanel Homepage, scroll down to Security, then select SSL/TLS Status.

You should see the blue Run AutoSSL box above Certificate Status.
If you don't, unfortunately, AutoSSL is not enabled by your host, and this section doesn't apply to you. Go to the next section: AutoSSL not enabled or you want a paid SSL.
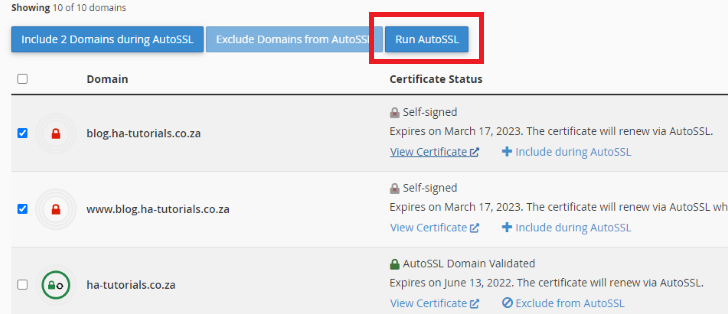
If you can see Run AutoSSL: Check all domains you want the SSL(s) to apply to.
Click Run AutoSSL and wait for it to finish.
If it’s successful, it’ll look like this:

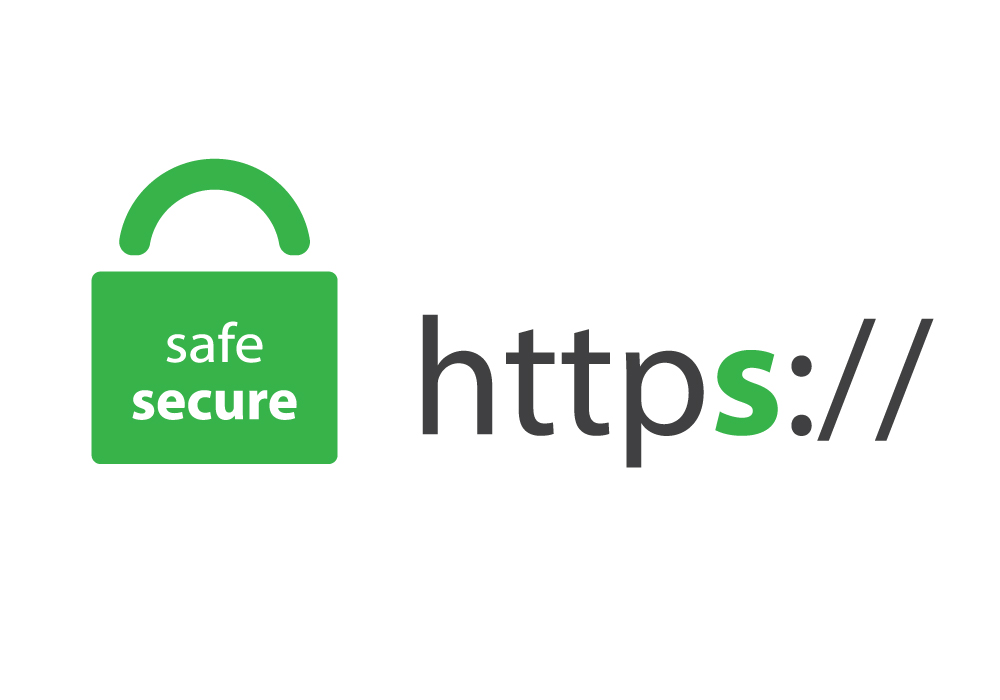
You can also check by visiting your website in your browser and looking for the lock. It should look similar to our site below.

It might take a few moments to make the connection but shouldn’t take too long.
To be on the side of precaution, on cPanel Homepage, navigate to Domains in the Domains section.

Once inside, enable Force HTTPS Redirect.

Another way to manage installed SSLs is in the SSL/TLS area.
From the cPanel home area, navigate to the Security section.
Click on SSL/TLS.

Then, Manage SSL sites on the right-hand side of the screen.

Naturally, the domains with the green padlocks are the ones with SSL certificates installed.

If AutoSSL is not enabled, you’ll need to purchase an SSL.
Now, this section may vary depending on how your cPanel is set up, but you can purchase an SSL through cPanel or your WHMCS Client Area.
This is only possible if your hosting provider has enabled the cPanel Store in WHM.

Note: If you don’t have a SSL/TLS Wizard section on your cPanel homepage this won’t work for you, and you'll have to use WHMCS instead (next section).
Log in to your cPanel using any of the following methods:
Option 1: Use the cpanel sub-domain prepended to your domain. i.e cpanel.yourwebsite.com
Option 2: Use cPanel’s port (:) 2083 appended to your domain or IP address i.e. yourwebsite.com:2083 or 123.234.123.234:2083
Both should take you to cPanel’s browser login page:
Option 3: Through your WHMCS Client Area: Log in to your Client Area, select the relevant Product/Service.
Under the Actions panel on the left-hand side, click Login to cPanel.
Now, navigate to the Security section and click on SSL/TLS Wizard to by an SSL.
If you’re looking to secure that warranty we mentioned earlier, or you’re running a business that requires a stronger reputation, a paid SSL certificate might be your best bet.
You can purchase it from your WHMCS Client Area. Log in to your Client Area and follow these steps:
1. Navigate to the Services drop down menu

2. In the drop down, click Order New Services.
3. Once the page loads, scroll down and look for Sectigo Products on the left and click it.

4. You’ll see a list of available products. Choose the right one for yourself. If you aren’t sure which one is right for you, you should check out our blog on why you should always use SSL certificates.
Once you’ve made your payment choice, enter your domain in the Primary Domain field.

5. You’ll have a chance to review your purchase and ensure everything is in order. When you’re satisfied click Checkout.
Your SSL certificate will be ready for use after a short while. Follow the next steps in this guide to install it.
Once you’ve purchased an SSL from the offerings available, you’ll of course need to install the SSL:
Download and extract the SSL certificate and its details to get started. Follow these steps:
Click on Manage SSL sites in the Security panel.

Copy the certificate code into the Certificate: (CRT) block provided.
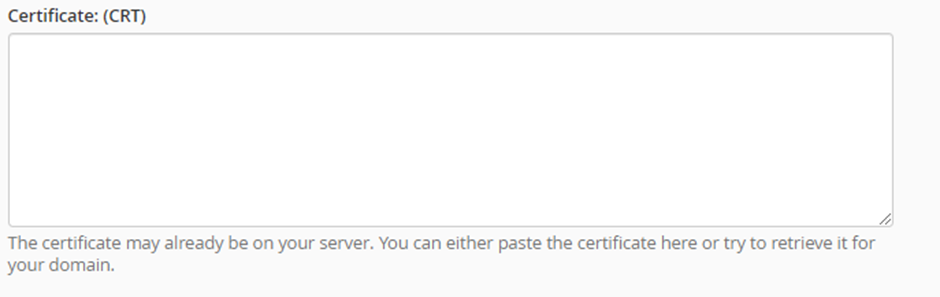
Next, click on the Autofill by certificate button if it hasn’t generated the content.
Copy the chain of intermediate certificates into the box under Certificate Authority Bundle: (CABUNDLE) if it didn’t fill automatically.
Finally, click on Install Certificate.

Simple as that.
If you’re on the proactive side of the spectrum and already purchased an SSL, follow along and we’ll show you how to get it installed.
1. Download your certificates.
To start, you’ll need to download the Intermediate Certificate from the service that you purchased your certificates from. You’ll receive your Primary Certificate via email or through the customer area of the website.
Assuming you purchased an SSL with us, it’ll show up here in your Client Area:

2. Log in to cPanel: Open the SSL Manager menu SSL/TLS . Click the Generate, view, upload, or delete SSL certificates link.

Click the Upload Certificate button to browse for the certificate that you received from the certificate provider. If the certificate came as text, paste it into the box in the browser.

3. Click the Install SSL Certificate link.
This will finalise the installation of the SSL certificate. Your server will restart, and your certificate will begin being distributed.
4. Test your certificate.
You can use various web browsers to test that your certificate is working properly. Connect to your website using https:// to force the SSL connection. You should see the padlock icon in your address bar, usually with a green background.
And that takes care of that. You’re now one of the secure areas of the internet neighbourhood. Of course, this is not to say that security issues are banished to people without SSL certificates, but it does make your website considerably safer.
It also lets people know you value their online safety and that you’re trustworthy, which is what we all want for our websites. That and thousands of visitors. We got you started on SSL certificate, now go get a

Keep your website visitors safe by learning what an SSL certificate is, how it works, and why you need one for your website to be trusted
When Chrome 68 was released in July of this year, the changes in Chrome for HTTPS & HTTP indicators was the biggest change Chrome had implemented.

With so many SSL choices, it's hard to decide what we need. Let's take a look at the types and which may be better suited to your needs.