Est. reading time: 5 minutes

Dedicated Servers
High-performance, bare-metal, dedicated servers with root, IPMI and RMM access.
Container VPS Hosting
Virtual servers give you the dedicated server experience affordably.
Linux Virtual Machines
Cloud-based Linux virtual machines powered by KVM.
Windows Cloud Servers
Windows virtual server hosting within the cloud for fast reliable connectivity.
Managed cPanel Servers
Managed cPanel cloud server hosting with priority support and daily backups.
Managed Colocation New!
Secure hosting for your critical infrastructure.
Accounting Software Hosting New!
Efficient, cloud-based hosting for accounting software.
Web Hosting
Take your idea or business online today with our shared web hosting solutions.
Email Hosting
Let your customers know they are dealing with a legitimate business by using a custom email address.
Site Builder
Build your own website online with our easy drag and drop website builder.
LiteSpeed Hosting
Accelerated LiteSpeed hosting with improved performance for your website, blog or online shop.
WordPress Hosting
Build your WordPress website with thousands of plugins and themes to choose from.
Register a domain
Search for and register your domain today.
Transfer your domain
Transfer your existing domain to us.
Domain prices
View prices for all domain registrations, renewals and transfers.
WHOIS Lookup
Lookup every single domain currently registered in the world.
VPS Reseller
Becoming a VPS reseller is a great way to earn money.
Reseller Web Hosting (WHM)
A great way to earn money and build your own web hosting company.
LiteSpeed Hosting Reseller
Advanced server-side caching to accelerate your LiteSpeed enabled websites
Domain Resellers
Resell Domains and profit from our large reseller rebates.
Acronis Online Backup Reseller
Become an Acronis online backup reseller to maximize your revenue.
Login
Log in to your personal HOSTAFRICA account
Register
Don't have an account yet ? Create a new one
Forgot Password?
Recover your account password
Move to HOSTAFRICA
Free cPanel to cPanel and domain name transfers with any new plan!
Announcements
All the latest from HOSTAFRICA
Knowledgebase
Browse our knowledge base to get help immediately.
Network Status
Network issues & scheduled maintenances
Contact us
Need other help with your HOSTAFRICA account?
Blog
Find our latest news, guides and tutorials here.
Ever since Windows Server 2008 R2, we have been able to break away from the need to access a full desktop in order to use a single application. This means that we can have an application shortcut on your desktop that looks and acts like a normal shortcut but opens an application directly off a remote server. This is without ever installing the application itself on your desktop.
The fact that only the application interface is transmitted over the already fast RDP(Remote Desktop Protocol) session instead of a whole Windows desktop, means that the application runs significantly faster than opening a full RDP session and then running the application. In Server 2008R2 it was called Remote Applications, but as of Server 2012, it is known as RDS (Remote Desktop Services).
This is a GREAT solution to often buggy remote clients that disconnect at a whim (ie Pastel). Let’s have a look at setting this up.
One caveat to remember – your server hostname MUST be a full domain name (FQDN) that resolves e.g. rdp01.mydomain.co.za. If it is not, the Remote application links will NOT work.
Server Roles to install –There are 3 main roles that need to be installed and can be done on a single server. These are:
Only install these if you are planning on having more than 2 concurrent RDP or RDS sessions at a time. Even if you have 100 users, if only 2 ever connect at the same time, you do not need the extra roles. You can install these on the same server as the above, but if you have many users, you may need to split these roles off onto another server. Keep installation of roles down to the minimum you need. Roles can always be added if you should expand. These roles are:
![]() Open the Server Manager Dashboard – this can usually be found at the bottom left of the screen next to the “Start” button.
Open the Server Manager Dashboard – this can usually be found at the bottom left of the screen next to the “Start” button.

Click on Option 2 – Add roles and features.
 This will open a new window called the “Add Roles and Features Wizard”.
Select “Role-based or feature-based installation” as we need to install Active Directory to enable a local domain.
Click on “Next” at the bottom.
At the next window – the “Select destination server” we are going to leave all defaults and click “Next”.
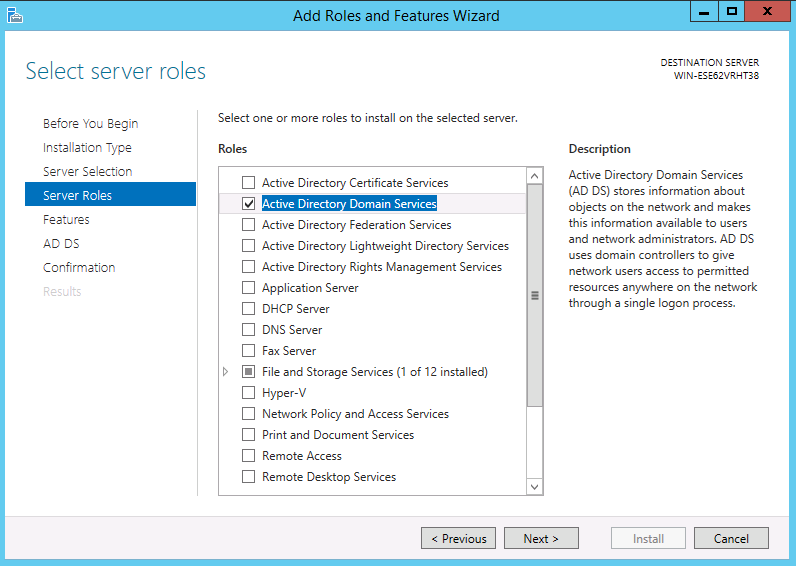 Here we pick “Active Directory Domain Services” as our “server role” and accept any choices that pop up.
The next window – “Select Features” is also one we will breeze through and click “Next”, then “Next” again, and finally “Install”. Here you can choose to Automatically Restart or Manually. I find Automatic a good option on a new server.
This will bring you back to the Server Manager Dashboard (with or without a restart).
 Here you will select “AD DS” on the far left, then select “More…” from the yellow action bar at the top.

Here you must select the underlined text “Promote this server to a domain controller”
A new window will pop up called “Deployment Configuration”

Here you must select “Add a new forest” and type in a root domain name unique to your organization. Tip: DO NOT USE A REGISTERED DOMAIN NAME such as “GOOGLE.COM” – use your own company with a . LAN ending e.g. SERV01/MYCOMPANY.LAN.
This will ensure that any registered domains do not conflict with your server domain.
Click “Next” and at the next screen UN-TICK “Domain Name System (DNS) Server“, enter an AD Recovery password of your choice (remember to note this down) and click “Next”. Click “Next” at the following screen (Additional Options), and “Next” at the “Paths” screen. “Next” at the Review screen (unless you want to change something) and then finally “Install”.
The server will now reboot which could take up to 30 minutes as it configures itself.
Once you have logged in again as administrator, go to the Server Manager again.
Now we select option 2 again, “Add roles and features”.

We will now choose to go past the “Before you begin” page and choose the “Remote Desktop Services installation” radio button at the “Select installation type” page and once again click “Next”.
The next page is the “Select deployment type where you must select the “Quick Start” radio button and then click “Next”.
On the “Select deployment scenario” page, select the “Session-based desktop deployment” radio button and click “Next”.
 On the “Select a server” page, the local server should already be pre-selected as we are doing a standalone installation.
You may safely click on – you guessed it – “Next”!
The last page is the “Confirm selections” page where we have to choose “Restart the destination server automatically if required” and then click on “Deploy”.
Once this process has been completed (it may even fail once or twice, but just keep on doing it, it usually completes) you can start deploying your remote applications. This we will talk about in the next article.
Happy Hosting!

In this quick tutorial, we show you how to set up and use one IP address for multiple sites in IIS web server.

Learn how Windows PowerShell vs Command Prompt, how to use PS commands, scripts, policies, pipe, variables & more.

In our previous post, we had just completed installing Remote Desktop Services. We will now look at adding applications and accessing them.