Est. reading time: 5 minutes

Dedicated Servers
High-performance, bare-metal, dedicated servers with root, IPMI and RMM access.
Container VPS Hosting
Virtual servers give you the dedicated server experience affordably.
Linux Virtual Machines
Cloud-based Linux virtual machines powered by KVM.
Windows Cloud Servers
Windows virtual server hosting within the cloud for fast reliable connectivity.
Managed cPanel Servers
Managed cPanel cloud server hosting with priority support and daily backups.
Managed Colocation New!
Secure hosting for your critical infrastructure.
Accounting Software Hosting New!
Efficient, cloud-based hosting for accounting software.
Web Hosting
Take your idea or business online today with our shared web hosting solutions.
Email Hosting
Let your customers know they are dealing with a legitimate business by using a custom email address.
Site Builder
Build your own website online with our easy drag and drop website builder.
LiteSpeed Hosting
Accelerated LiteSpeed hosting with improved performance for your website, blog or online shop.
WordPress Hosting
Build your WordPress website with thousands of plugins and themes to choose from.
Register a domain
Search for and register your domain today.
Transfer your domain
Transfer your existing domain to us.
Domain prices
View prices for all domain registrations, renewals and transfers.
WHOIS Lookup
Lookup every single domain currently registered in the world.
VPS Reseller
Becoming a VPS reseller is a great way to earn money.
Reseller Web Hosting (WHM)
A great way to earn money and build your own web hosting company.
LiteSpeed Hosting Reseller
Advanced server-side caching to accelerate your LiteSpeed enabled websites
Domain Resellers
Resell Domains and profit from our large reseller rebates.
Acronis Online Backup Reseller
Become an Acronis online backup reseller to maximize your revenue.
Login
Log in to your personal HOSTAFRICA account
Register
Don't have an account yet ? Create a new one
Forgot Password?
Recover your account password
Move to HOSTAFRICA
Free cPanel to cPanel and domain name transfers with any new plan!
Announcements
All the latest from HOSTAFRICA
Knowledgebase
Browse our knowledge base to get help immediately.
Network Status
Network issues & scheduled maintenances
Contact us
Need other help with your HOSTAFRICA account?
Blog
Find our latest news, guides and tutorials here.
Step one: click install.
We jest, but our installation guide for Acronis backups are only slightly more complicated. A few commands here and there, sure, but every outcome from each step is accounted for so you can’t lose your way.
All in all, this Acronis installation guide will take you from newbie to protected in just a few short steps. Now, onward to the guide!
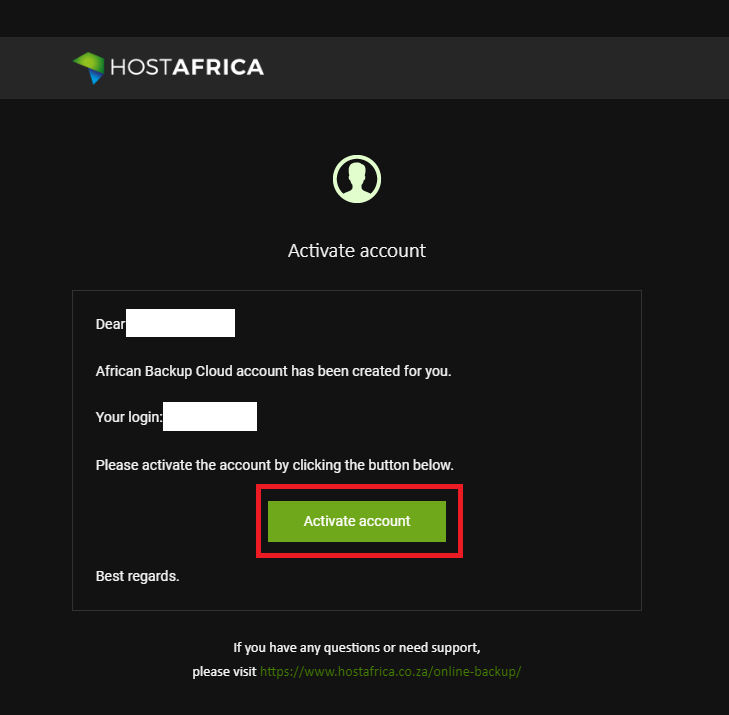
Once you’ve completed your Acronis Backup Order via our website, check your email for the account activation mail from backup@hostafrica.com. Click on the “Activate account” button which’ll redirect you to the Acronis Backup Management Console where you will set up a password upon your first login.
Next, follow the installation instructions below for the device/operating system of your choice.
1. Next, you’ll need to click on the “Add Devices” button and select your device or platform of choice on the right-hand side of your screen.

2. Once you’ve selected your operating system/platform the agent installer will automatically download and you can click on it to start the installation process.


3. After the installation has been completed, click on “Register Machine”. This’ll redirect you to the Cloud Management Console where you will need to “Confirm Registration“.


4. In Windows, click on the Acronis Icon in the bottom right of your screen (in your taskbar) then click “Apply Default Protection Plan“.

5. Your device is now protected. You will now be able to view and restore backups via the Acronis Backup Management Console.


1. Download the Acronis Agent for Linux installer directly via terminal using the following command:
sudo wget https://dl.managed-protection.com/u/baas/4.0/12.0.3957/Backup_Agent_for_Linux_x86_64.bin

2. Once downloaded, grant the necessary permissions to run the installer:
sudo chmod 755 Backup_Agent_for_Linux_x86_64.bin

3. Next, install rpm:
sudo apt-get install rpm

4. Then download updates:
sudo apt-get update

5. Launch the installer as root and enter your Acronis Cloud login details:
sudo ./Backup_Agent_for_Linux_x86_64.bin

6. If you see the following message you will need to install GCC manually:

To install GCC manually, run the following commands:
sudo apt-get update
sudo apt-get install linux-headers-`uname -r`
sudo apt-get install linux-image-`uname -r`
sudo apt-get install gcc-<package version>
sudo apt-get install make
sudo apt-get install perl
sudo ./Backup_Agent_for_Linux_x86_64.bin
/usr/lib/Acronis/BackupAndRecovery/AmsRegisterHelper register https://cloud.acronis.com/ <USERNAME> <PASSWORD>
7. Once the setup has been completed the device will be available in the Acronis Backup Management Console and you can start backing up your data:

Before starting, there are a few packages and prerequisites that are needed to add the Acronis Backup modules to the Linux kernel. These include:
Follow the below steps to check whether the required packages are already installed.
make -vgcc –vcat /proc/version commandyum list installed | grep kernel-develdpkg --get-selections | grep linux-headers dpkg --get-selections | grep linux-image sudo yum install rpm (Red Hat based distributions)sudo apt-get install rpm (Debian based distributions)The following table lists how to install the required packages in various Linux distributions.
| Linux distribution | Package names | How to install |
|---|---|---|
| Red Hat Enterprise Linux | kernel-devel gcc make |
The setup program will download and install the packages automatically by using your Red Hat subscription. |
| CentOS | kernel-devel gcc make |
The setup program will download and install the packages automatically. |
| Fedora | kernel-devel gcc make |
Run the following commands as the root user (specify the required GCC version in the GCC package name):yum install kernel- devel-` uname -r`yum install gcc-4.5.1yum install make |
| Ubuntu | linux -headers linux -image gcc make |
Run the following commands (specify the required GCC version in the GCC package name):sudo apt-get update sudo apt-get install linux -headers-`uname -r` sudo apt-get install linux -image-`uname -r` sudo apt-get install gcc-4.6 sudo apt-get install make |
Now that you’ve checked the prerequisites, it’s time to do the actual installation.
chmod +x Backup_Agent_for_Linux_x86_64.bin or chmod 755 filename.bin./Backup_Agent_for_Linux_x86_64.binIf your password contains special characters, you may encounter or receive a similar error while providing correct credentials:
Register",
"module" : 0,
"suberror" : null,
"text" : "Getting refresh token failed: {\"error\":\"access_denied\",\"error_description\":\"Failed to authorize\"}" },
"reason" : "internalError",
"serCode" : "0x00000191"
This can be fixed by entering the following command:
./RegisterAgentBin -o register -t cloud -a https://cloud.acronis.com -u <username> -p <encoded password> --base64Pretty simple, ‘ey? Nothing our expertise and your inputs can’t fix or get installed. Now that you’ve backed up, you’ve got one less thing to worry about and another 99 more to take care of. Good luck!
If you’re a reseller, keep an eye out for our next post where we’ll go over the account setup as well as the steps to add additional storage locations.

This quick guide will take you through the steps to creating your plans and adding additional storage locations for your Acronis Backup reseller account.
Restoring lost information can be a breeze if you have a backup. Don't put it off any longer. Secure your data and learn how to backup.

Data loss can hit at any time, and it pays to be prepared. Data loss can happen accidentally or unintentionally, for example as a result of defective...