Est. reading time: 9 minutes

Dedicated Servers
High-performance, bare-metal, dedicated servers with root, IPMI and RMM access.
Container VPS Hosting
Virtual servers give you the dedicated server experience affordably.
Linux Virtual Machines
Cloud-based Linux virtual machines powered by KVM.
Windows Cloud Servers
Windows virtual server hosting within the cloud for fast reliable connectivity.
Managed cPanel Servers
Managed cPanel cloud server hosting with priority support and daily backups.
Managed Colocation New!
Secure hosting for your critical infrastructure.
Accounting Software Hosting New!
Efficient, cloud-based hosting for accounting software.
Web Hosting
Take your idea or business online today with our shared web hosting solutions.
Email Hosting
Let your customers know they are dealing with a legitimate business by using a custom email address.
Site Builder
Build your own website online with our easy drag and drop website builder.
LiteSpeed Hosting
Accelerated LiteSpeed hosting with improved performance for your website, blog or online shop.
WordPress Hosting
Build your WordPress website with thousands of plugins and themes to choose from.
Register a domain
Search for and register your domain today.
Transfer your domain
Transfer your existing domain to us.
Domain prices
View prices for all domain registrations, renewals and transfers.
WHOIS Lookup
Lookup every single domain currently registered in the world.
VPS Reseller
Becoming a VPS reseller is a great way to earn money.
Reseller Web Hosting (WHM)
A great way to earn money and build your own web hosting company.
LiteSpeed Hosting Reseller
Advanced server-side caching to accelerate your LiteSpeed enabled websites
Domain Resellers
Resell Domains and profit from our large reseller rebates.
Acronis Online Backup Reseller
Become an Acronis online backup reseller to maximize your revenue.
Login
Log in to your personal HOSTAFRICA account
Register
Don't have an account yet ? Create a new one
Forgot Password?
Recover your account password
Move to HOSTAFRICA
Free cPanel to cPanel and domain name transfers with any new plan!
Announcements
All the latest from HOSTAFRICA
Knowledgebase
Browse our knowledge base to get help immediately.
Network Status
Network issues & scheduled maintenances
Contact us
Need other help with your HOSTAFRICA account?
Blog
Find our latest news, guides and tutorials here.
In today’s fast-paced world, you need to have an automated way to deploy, install, and manage software across your infrastructure. Ansible is an easy-to-use tool built for this very purpose.
It’s automation software that allows users to provision hosts, configure environments, install packages, deploy applications, and perform many other administrative and management tasks.
In this article, we use Ansible playbooks to set up a Kubernetes cluster on CentOS Stream 8, with one master and one worker node. We will use three virtual machines (VMs) in total: two for the Kubernetes cluster, and one for the Ansible host.
Ansible is a powerful automation tool that helps reduce time spent manually configuring and executing recurring tasks as well as reduce the mistakes made when those tasks are often repeated.
Automation is achieved through playbooks. A playbook is simply a YAML file that contains the different steps to be performed on the target machine(s).
You can define a step to execute a command, copy a file from its source to destination, write something to a file, become a different user, and even complicated things like replacing a particular line in a file.
You can automate the deployment and installation of virtually anything with an Ansible playbook.
For example, if you want to deploy a containerized application using Ansible, you can define a playbook with the following steps:
Kubernetes is a container orchestration software that allows users to set up a multi-container cluster using YAML configuration files.
A Kubernetes cluster can auto-restart containers, auto-scale, and auto-heal. It’s very much the lifeblood of modern cloud infrastructures.
A Kubernetes cluster is made up of at least one master and one worker node. In most production use-cases, there can be several masters and workers.

The master nodes manage scheduling, workload distribution, and the maintenance of the overall cluster state. For example, if a node/container goes down, it’s the master’s responsibility to bring up a replacement.
The worker nodes run the pods (groups of containers) that house user applications. The main components of a worker node are:
dockershim was removed in Kubernetes version 1.24, it’s no longer recommended to use Docker as the container runtime. So, we will be using containerd in this guide. However, if you still want to use Docker, you can install cri-dockerd, which lets you run Docker with the Kubernetes Container Runtime Interface.We will be using one CentOS Stream 8 VM as the Ansible host. On this VM, we will prepare our Ansible playbooks and then use them to set up the Kubernetes cluster on the other 2 VMs.
Let’s begin by installing Ansible on it:
Update your system.
sudo dnf –y update
Install the EPEL repo to get the latest Ansible. Then update the repository cache.
sudo dnf install epel-next-release
sudo dnf -y update
Finally, install Ansible.
sudo dnf -y install ansible
To let Ansible work its magic, it needs to connect to the other two servers without requiring a password. To allow this, we need to generate an SSH key pair on our Ansible VM and copy over the public key on both the cluster VMs. Follow these steps:
Use the ssh-keygen utility to start generating the key pair.
Hit Enter when prompted to specify the location and passphrase. This will create the keys in the default directory with no passphrase.
Now, use the following command to copy the public key to both hosts, one by one. Make sure you replace each IP address with the correct one.
ssh-copy-id -i ~/.ssh/id_rsa.pub master@112.120.122.165
ssh-copy-id -i ~/.ssh/id_rsa.pub worker@112.120.122.163
mkdir kube && cd kube
Create a new file named hosts:
vi hosts
Add cluster hosts information:
[masters]
master ansible_host=102.130.122.113 ansible_user=root

[workers]
worker1 ansible_host=102.130.122.122 ansible_user=root
This should get our Ansible host all set up to communicate with the cluster VMs.
To verify that the connectivity is indeed up, use the following command:
ansible -i hosts all -m ping
Expect the following output:
worker1 | SUCCESS => {
"ansible_facts": {
"discovered_interpreter_python": "/usr/libexec/platform-python"
},
"changed": false,
"ping": "pong"
}
master | SUCCESS => {
"ansible_facts": {
"discovered_interpreter_python": "/usr/libexec/platform-python"
},
"changed": false,
"ping": "pong"
}
The next step is to create a user for Kubernetes with sudo privileges. It’s convenient to just use the root user but it’s not recommended from a security standpoint.
Let’s create a small playbook to create the user and give it sudo privileges:
Create a new playbook file named create-users.yml
vi create-users.yml
Add the following content to the file and save:
- hosts: 'workers, masters'
  become: yes

  tasks:
    - name: make a new user named kube
      user: name=kube append=yes state=present createhome=yes shell=/bin/bash

    - name: give the new user privileges to run sudo without requiring a password
      lineinfile:
        dest: /etc/sudoers
        line: 'kube ALL=(ALL) NOPASSWD: ALL'
        validate: 'visudo -cf %s'

    - name: add authorized key for the new user
      authorized_key: user=kube key="{{item}}"
      with_file:
        - ~/.ssh/id_rsa.pub
Indentation is very important, make sure it looks like this:

Explanation: At the start of our playbook, we specify the hosts, which include workers and masters, the two host categories we defined in our hosts file. Then we add the three tasks. The text following the name identifiers describes what is being done in a particular step/task of the playbook.
Now let’s execute our first playbook using this command:
ansible-playbook -i hosts create-users.yml
Expect an output similar to the following (ssh keys redacted):
PLAY [workers, masters] ***************************************************************************************************************
TASK [Gathering Facts] ***************************************************************************************************************
ok: [worker1]
ok: [master]

TASK [make a new user named kube] ***************************************************************************************************************
changed: [worker1]
changed: [master]

TASK [give the new user privileges to run sudo without requiring a password] ***************************************************************************************************************
changed: [master]
changed: [worker1]

TASK [add authorized key for the new user] ***************************************************************************************************************
changed: [worker1] => (item=ssh-rsa*****redacted****)
changed: [master] => (item=ssh-rsa****redacted****)

PLAY RECAP ***************************************************************************************************************
master                     : ok=4    changed=3    unreachable=0    failed=0    skipped=0    rescued=0    ignored=0
worker1                    : ok=4    changed=3    unreachable=0    failed=0    skipped=0    rescued=0    ignored=0
Let’s install Kubernetes by setting up another Ansible playbook.
Create a new playbook file named install-kube.yml
vi install-kube.yml
remote-user with your own username,---
- hosts: "masters, workers"
remote_user: hostafrica
become: yes
become_method: sudo
become_user: root
gather_facts: yes
connection: ssh
tasks:
- name: Creating a configuration file for containerd, our container runtime
file:
path: "/etc/modules-load.d/containerd.conf"
state: "touch"
- name: setting up pre-requisites for containerd
blockinfile:
path: "/etc/modules-load.d/containerd.conf"
block: |
overlay
br_netfilter
- name: loading required modules
shell: |
sudo modprobe overlay
sudo modprobe br_netfilter
- name: adding required settings for containerd
blockinfile:
path: "/etc/sysctl.d/99-kubernetes-cri.conf"
block: |
net.bridge.bridge-nf-call-iptables = 1
net.ipv4.ip_forward = 1
net.bridge.bridge-nf-call-ip6tables = 1
- name: configuring network settings for Kube
file:
path: "/etc/sysctl.d/99-kubernetes-cri.conf"
state: "touch"
- name: make settings applicable without restart
command: sudo sysctl --system
- name: installing containerd and settings its config. restart as well.
shell: |
sudo dnf install -y containerd
sudo mkdir -p /etc/containerd
sudo containerd config default | sudo tee /etc/containerd/config.toml
sudo systemctl restart containerd
- name: Create a kube repo file
file:
path: "/etc/yum.repos.d/kubernetes.repo"
state: "touch"
- name: write repo information in kube repo file
blockinfile:
path: "/etc/yum.repos.d/kubernetes.repo"
block: |
[kubernetes]
name=Kubernetes
baseurl=https://packages.cloud.google.com/yum/repos/kubernetes-el7-x86_64
enabled=1
gpgcheck=1
repo_gpgcheck=1
gpgkey=https://packages.cloud.google.com/yum/doc/yum-key.gpg https://packages.cloud.google.com/yum/doc/rpm-package-key.gpg
- name: install kubernetes
shell: |
sudo dnf install -y kubelet kubeadm kubectl
- name: disabling swap as it’s required for kubelet
shell: |
sudo swapoff -a
sudo sed -i '/ swap / s/^\(.*\)$/#\1/g' /etc/fstab
Indentation is very important, make sure it looks like this:


Explanation: Read the text after the name identifiers in the playbook to know what’s being done in the different steps of the playbook
Execute the playbook to install Kubernetes on both VMs.
ansible-playbook -i hosts install-kube.yml
Since there are a lot of steps in this playbook, it may take some minutes to finish. Make sure you see the following lines at the end of your output:
PLAY RECAP *****************************************************************************************************************
master                     : ok=12   changed=11    unreachable=0    failed=0    skipped=0    rescued=0    ignored=0
worker1                    : ok=12   changed=11    unreachable=0    failed=0    skipped=0    rescued=0    ignored=0
At this stage, we should have all the required Kubernetes packages installed and settings done on our VMs.
Let’s whip up another playbook to set up our master node.
Create a new playbook file named master-setup.yml
vi master-setup.yml
Paste the following lines to the file and save.
- hosts: masters
  become: yes
  tasks:
    - name: start the cluster
      shell: kubeadm init --pod-network-cidr=10.244.0.0/16
      args:
        chdir: $HOME
      async: 60
      poll: 60

    - name: create a new directory to hold kube conf
      become: yes
      become_user: kube
      file:
        path: $HOME/.kube
        state: directory
        mode: 0755

    - name: copy configuration file to the newly created dir
      copy:
        src: /etc/kubernetes/admin.conf
        dest: /home/kube/.kube/config
        remote_src: yes
        owner: kube

    - name: set kubeconfig file permissions
      file:
        path: /home/kube/.kube/config
        owner: "{{ ansible_effective_user_id }}"
        group: "{{ ansible_effective_group_id }}"

    - name: Apply a calico manifset to init the pod network
      become: yes
      become_user: kube
      shell: kubectl apply -f https://docs.projectcalico.org/manifests/calico.yaml
      args:
        chdir: $HOME

    - name: Get the join command to be used by the worker
      become: yes
      become_user: kube
      shell: kubeadm token create  --print-join-command
      register: kube_join_command

    - name: Save the join command to a local file
      become: yes
      local_action: copy content="{{ kube_join_command.stdout_lines[0] }}" dest="/etc/kube_join_command" mode=0777
Indentation is very important, make sure it looks like this:

Explanation: Read the text after the name identifiers in the playbook to know what’s being done in the different steps of the playbook.
ansible-playbook -i hosts master-setup.yml
This playbook will only run on the master node. Expect the following lines at the end of the output:
PLAY RECAP **********************************************************************************************************master
: ok=8    changed=7    unreachable=0    failed=0    skipped=0    rescued=0    ignored=0
Now, on your master node, run
kubectl get nodes
Output
NAME          STATUS   ROLES           AGE    VERSION
master-node   Ready    control-plane   7m9s   v1.24.1
This shows that everything worked smoothly till now!
The last step of this guide will make the worker node join the cluster. We will once again use a playbook to do so.
Create a new playbook file named worker-setup.yml
vi worker-setup.yml
Paste the following lines to the file and save.
- hosts: workers
  become: yes
  gather_facts: yes

  tasks:
   - name: Fetch the join command we wrote to a file in previous step and move it to the worker node.
     become: yes
     copy:
       src: /etc/kube_join_command
       dest: /etc/kube_join_command
       mode: 0777

   - name: Join the Worker node to the cluster.
     become: yes
     command: sh /etc/kube_join_command
Indentation is very important, make sure it looks like this:
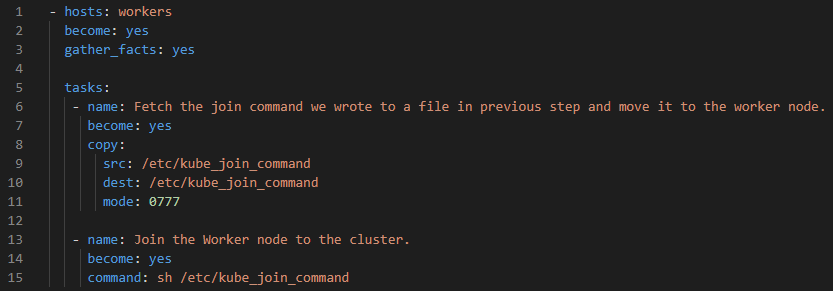
Explanation: Read the text after the name identifiers in the playbook to know what’s being done in the different steps of the playbook.
ansible-playbook -i hosts worker-setup.yml
Expect the following output:
PLAY [workers] ***************************************************************************************************************
TASK [Gathering Facts] ***************************************************************************************************************
ok: [worker1]

TASK [Fetch the join command we wrote to a file in previous step and move it to the worker node.] *********************************************************************************************changed: [worker1]

TASK [Join the Worker node to the cluster.] ***************************************************************************************************************
changed: [worker1]

PLAY RECAP *******************************************************************************************************worker1
: ok=3    changed=2    unreachable=0    failed=0    skipped=0    rescued=0    ignored=0
…and that’s it! Once the final playbook has run, our two-node Kubernetes cluster is up and running.
We can verify this by looking at the output of the kubectl get nodes command again.
NAME          STATUS   ROLES           AGE    VERSION
master-node   Ready    control-plane   110s   v1.24.1
worker-node   Ready    <none>          23s    v1.24.1

In this article, we'll go through all the steps you need to set up a Kubernetes cluster on two Ubuntu 20.04 machines.

We walk you through the steps to deploy a Kubernetes cluster on two CentOS Stream machines using Containerd.