Est. reading time: 23 minutes

Dedicated Servers
High-performance, bare-metal, dedicated servers with root, IPMI and RMM access.
Container VPS Hosting
Virtual servers give you the dedicated server experience affordably.
Linux Virtual Machines
Cloud-based Linux virtual machines powered by KVM.
Windows Cloud Servers
Windows virtual server hosting within the cloud for fast reliable connectivity.
Managed cPanel Servers
Managed cPanel cloud server hosting with priority support and daily backups.
Managed Colocation New!
Secure hosting for your critical infrastructure.
Accounting Software Hosting
Efficient, cloud-based hosting for accounting software.
Web Hosting
Take your idea or business online today with our shared web hosting solutions.
Email Hosting
Let your customers know they are dealing with a legitimate business by using a custom email address.
Site Builder
Build your own website online with our easy drag and drop website builder.
LiteSpeed Hosting
Accelerated LiteSpeed hosting with improved performance for your website, blog or online shop.
WordPress Hosting
Build your WordPress website with thousands of plugins and themes to choose from.
Register a domain
Search for and register your domain today.
Transfer your domain
Transfer your existing domain to us.
Domain prices
View prices for all domain registrations, renewals and transfers.
WHOIS Lookup
Lookup every single domain currently registered in the world.
VPS Reseller
Becoming a VPS reseller is a great way to earn money.
Reseller Web Hosting (WHM)
A great way to earn money and build your own web hosting company.
LiteSpeed Hosting Reseller
Advanced server-side caching to accelerate your LiteSpeed enabled websites
Domain Resellers
Resell Domains and profit from our large reseller rebates.
Acronis Online Backup Reseller
Become an Acronis online backup reseller to maximize your revenue.
Login
Log in to your personal HOSTAFRICA account
Register
Don't have an account yet ? Create a new one
Forgot Password?
Recover your account password
Move to HOSTAFRICA
Free cPanel to cPanel and domain name transfers with any new plan!
Announcements
All the latest from HOSTAFRICA
Knowledgebase
Browse our knowledge base to get help immediately.
Network Status
Network issues & scheduled maintenances
Contact us
Need other help with your HOSTAFRICA account?
Blog
Find our latest news, guides and tutorials here.
WireGuard is a free alternative to OpenVPN with great encryption, speed, and simplicity. The lightweight, secure, and cross-platform VPN relies on advanced cryptography technologies in addition to supporting Windows, Linux, MacOS, BSD, Android, and iOS operating systems.
WireGuard installation is quite easy. Once installed, you can establish a connection by first exchanging the matching keys between the server and the client. This means that only a client machine with a public key corresponding to the server’s key will connect.
Unlike the client-server models, the WireGuard is a peer to peer VPN. The operation depends on the configuration, and this determines if the peer will operate like the traditional server or client.
In this article we’ll show you how to set up your own VPN server running Debian 9, then set up the WireGuard client on your local machine that might be running Debian 9, Windows, CentOS 7, or Ubuntu 18.04.
Prerequisites
sudo privileges. Make sure sudo is installed with the following commandssu
apt-get install sudo -y
If you prefer to use root, sudo commands will still work. Alternatively, simply leave out the sudo prefix when you copy and paste all commands.
First, update the system
sudo apt update; sudo apt upgrade
Now, install the kernel headers
sudo apt install linux-headers-$(uname -r)
Add the repository
sudo echo "deb http://deb.debian.org/debian/ unstable main" | sudo tee /etc/apt/sources.list.d/unstable-wireguard.list
sudo echo -e "Package: *\nPin: release a=unstable\nPin-Priority: 150\n" | tee /etc/apt/preferences.d/limit-unstable
Next, update the packages list and upgrade.
sudo apt update
sudo apt upgrade
Install WireGuard and WireGuard tools.
sudo apt install wireguard-dkms wireguard-tools
If successful, you will see the following output.
Output

Building initial module for 4.9.0-17-amd64
Done.

wireguard:
Running module version sanity check.
 - Original module
   - No original module exists within this kernel
 - Installation
   - Installing to /lib/modules/4.9.0-17-amd64/updates/dkms/

depmod...

DKMS: install completed.
Setting up wireguard (1.0.20210914-1) ...
Setting up linux-headers-amd64 (4.9+80+deb9u15) ...
Processing triggers for libc-bin (2.24-11+deb9u4) ...
Enable the WireGuard kernel module and check the status
sudo modprobe wireguard && lsmod | grep wireguard
Output

wireguard             212992  0
ip6_udp_tunnel         16384  1 wireguard
udp_tunnel             16384  1 wireguard
We will now generate a private and public key which we will add to the server configuration file.
sudo wg genkey | sudo tee /etc/wireguard/server_private.key | sudo wg pubkey | sudo tee /etc/wireguard/server_public.key
This will save them in the WireGuard directory, and display your server public key:
Output

JBzWtHi9fGCfCcSs8e59tQ0Pwam16PeMVN2+SVhaL0k=
Copy and paste this key temporarily in someplace secure outside of your terminal, you’ll need it later (don’t forget to delete once you’ve set up everything).
We will now create the configuration file for the interface wg0 which will be routing the VPN traffic.
In this step, you will specify the IP subnet for the VPN network. For this article, we will use 10.10.0.1/24. When choosing the subnet, ensure that it is different from the office or home network to avoid conflicts.
First, find the name of your server’s public NIC using the command on your server
sudo ip a
You will get an output similar to below. Look for the NIC that contains your public IP.
In this case below, the public IP is 160.119.248.10 and it is assigned to ens3 (this is your NIC that you’ll need to add to the config file below)
Output

2: ens3:  mtu 1500 qdisc pfifo_fast state UP group default qlen 1000
     link/ether d2:4b:86:cd:b8:3a brd ff:ff:ff:ff:ff:ff
     inet 160.119.248.10/24 brd 160.119.248.255 scope global ens3
        valid_lft forever preferred_lft forever
Next, run the following cat command to display your server_private.key
sudo cat /etc/wireguard/server_private.key
Copy and paste your key and your NIC temporarily in someplace secure outside of your terminal, you’ll need to add it to the config file below. (Don’t forget to delete it once added)
Now, we will use GNU nano Text Editor. It should come pre-installed on Debian.
To create and open the blank configuration file, run
sudo nano /etc/wireguard/wg0.conf
Finally, add the configuration text below
[Interface]
PrivateKey = your server_private.key here
Address = 10.10.0.1/24
Address = fd86:ea04:1111::1/64
ListenPort = 51820
PostUp = iptables -A FORWARD -i wg0 -j ACCEPT; iptables -t nat -A POSTROUTING -o ens3 -j MASQUERADE; ip6tables -A FORWARD -i wg0 -j ACCEPT; ip6tables -t nat -A POSTROUTING -o ens3 -j MASQUERADE
PostDown = iptables -D FORWARD -i wg0 -j ACCEPT; iptables -t nat -D POSTROUTING -o ens3 -j MASQUERADE; ip6tables -D FORWARD -i wg0 -j ACCEPT; ip6tables -t nat -D POSTROUTING -o ens3 -j MASQUERADE
SaveConfig = true
Use arrow keys to navigate to text and retype.
NOTE:
your server_private.key here with your own server_private.key,10.10.0.1/24 with your desired IP subnet,ens3 with your own public NIC you found aboveIt should look as such with your own values added to fields with blue underline.
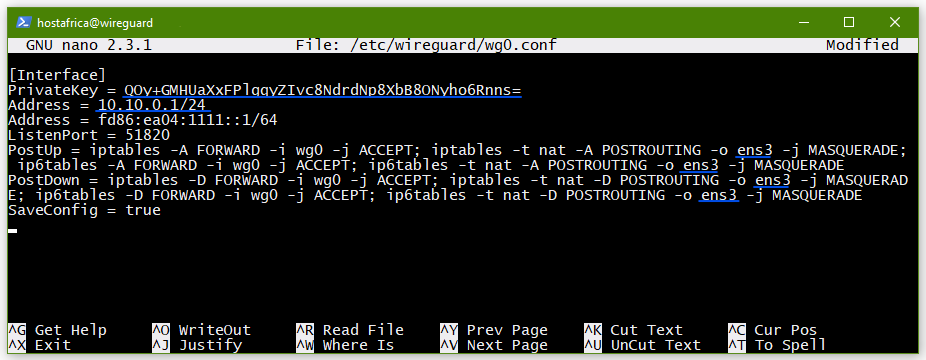
To save: Ctrl+O, Enter to save filename as is. To exit: Ctrl+X
Enable user rights with this command below, so that only allowed users can read the file
sudo chmod 600 /etc/wireguard/{server_public.key,wg0.conf}
sudo apt install ufw
sudo ufw allow 22/tcp
sudo ufw allow 51820/udp
sudo ufw enable
Verify settings
sudo ufw status verbose
Output

Status: active
Logging: on (low)
Default: deny (incoming), allow (outgoing), deny (routed)
New profiles: skip

To                               Action         From
--                               ------         ----
22/tcp                           ALLOW IN       Anywhere
51820/udp                        ALLOW IN       Anywhere
22/tcp (v6)                      ALLOW IN       Anywhere (v6)
51820/udp (v6)                   ALLOW IN       Anywhere (v6)
For NAT to work, we will enable forwarding for both IP4 and IP6 in the file /etc/sysctl.conf file as below.
Use nano to open the configuration file
sudo nano /etc/sysctl.conf
enable the following commands:
net.ipv4.ip_forward=1
and
net.ipv6.conf.all.forwarding=1
by navigating to each line, and removing the # sign at the beginning of the command to uncomment it.
It should look like this:

Save and exit: Ctrl+O, Enter, Ctrl+X
We are now ready to bring up the wg0 interface. To do this, use the wg-quick command as follows
sudo wg-quick up wg0
If you get an error about missing resolvconf
Output

[#] resolvconf -a wg0 -m 0 -x
/usr/bin/wg-quick: line 32: resolvconf: command not found
install it using the command below, and then try to start the interface again.
sudo apt install resolvconf
The started interface will return the following:
Output

[#] ip link add wg0 type wireguard
[#] wg setconf wg0 /dev/fd/63
[#] ip -4 address add 10.10.0.1/24 dev wg0
[#] ip -6 address add fd86:ea04:1111::1/64 dev wg0
[#] ip link set mtu 1420 up dev wg0
[#] iptables -A FORWARD -i wg0 -j ACCEPT; iptables -t nat -A POSTROUTING -o ens3 -j MASQUERADE; ip6tables -A FORWARD -i wg0 -j ACCEPT; ip6tables -t nat -A POSTROUTING -o ens3 -j MASQUERADE
You can now use the wg command to see active interfaces and connected peers.
sudo wg
Since we have not configured the client yet, the output should be as shown below.
Output

interface: wg0
  public key: JBzWtHi9fGCfCcSs8e59tQ0Pwam16PeMVN2+SVhaL0k=
  private key: (hidden)
  listening port: 51820
This shows that you have successfully configured your server interface.
Lastly, to enable WireGuard on system boot, run the command below on both the server and the client.
sudo systemctl enable wg-quick@wg0
For most operating systems, the installation process for WireGuard is the same for both the server and client. The only difference is the configuration file.
In this article, you will learn how to configure a client on Debian 9, Windows, CentOS 7, and Ubuntu 18.04.
You will start by installing the WireGuard, after which you will generate the key pair for the client, and finally, do the configuration.
Update client machine
sudo apt update; sudo apt upgrade
Install kernel headers
sudo apt install linux-headers-$(uname -r)
Add repo
sudo echo "deb http://deb.debian.org/debian/ unstable main" | sudo tee /etc/apt/sources.list.d/unstable-wireguard.list
sudo echo -e "Package: *\nPin: release a=unstable\nPin-Priority: 150\n" | sudo tee /etc/apt/preferences.d/limit-unstable
Update and upgrade packages
sudo apt update; sudo apt upgrade
Install WireGuard and tools
sudo apt install wireguard-dkms wireguard-tools
If successful, you will see the following output.
Output

Building initial module for 4.9.0-17-amd64
Done.

wireguard:
Running module version sanity check.
 - Original module
   - No original module exists within this kernel
 - Installation
   - Installing to /lib/modules/4.9.0-17-amd64/updates/dkms/

depmod...

DKMS: install completed.
Setting up wireguard (1.0.20210914-1) ...
Setting up linux-headers-amd64 (4.9+80+deb9u15) ...
Processing triggers for libc-bin (2.24-11+deb9u4) ...
Enable the WireGuard kernel module and check the status
sudo modprobe wireguard && lsmod | grep wireguard
Output

wireguard             212992  0
ip6_udp_tunnel         16384  1 wireguard
udp_tunnel             16384  1 wireguard
We will now generate a client private and public key which we will add to the client configuration file.
sudo wg genkey | sudo tee /etc/wireguard/client_private.key | sudo wg pubkey | sudo tee /etc/wireguard/client_public.key
This will save them in the WireGuard directory, and return your client public key:
Output

a9rp8VZrNOWDUGV5VCqCZlv1V9HuYsZtEP99VAt3NWw=
You can use the cat command to view the keys.
Run the following command to return your client private key:
sudo cat /etc/wireguard/client_private.key
Output

gPlIeCidK3PIfCrixvmmGMMzB2tapLWH2DkPC/jQc18=
Copy and paste both these keys in someplace secure outside of your terminal, you’ll need them again below (don’t forget to delete it once added to config files).
The process is similar to that of the server apart from the information in the configuration files.
We will call our interface wg0 and use the configuration file to define the private network, our client private key, and the server’s public key and IP address.
You will need to add your own values to the PrivateKey, PublicKey, and Endpoint fields in the code block further down.
PublicKey is the server_public.key on the server. Go to the server and obtain the key by running the cat command;
sudo cat /etc/wireguard/server_public.key
Output

JBzWtHi9fGCfCcSs8e59tQ0Pwam16PeMVN2+SVhaL0k=
Copy and paste this key in someplace secure outside of your terminal, you’ll need to add it to the config file below. (Don’t forget to delete it once added)
Time to create the client configuration file.
Now, we will use GNU nano Text Editor editor to create and open the blank configuration file:
sudo nano /etc/wireguard/wg0.conf
Now add the configuration text below.
[Interface]
Address = 10.10.0.2/32
Address = fd86:ea04:1111::2/128
SaveConfig = true
PrivateKey = your client_private.key here
DNS = 1.1.1.1

[Peer]
PublicKey = your server_public.key here
Endpoint = your server public ip:51820
AllowedIPs = 0.0.0.0/0, ::/0
Use arrow keys to navigate to text and retype.
NOTE:
Under [Interface]
Address = 10.10.0.2/32 this must be in the same IP subnet as your server is, but the IP cannot be exactly the same. For example: increase the last digit before the prefix /32 by 1. We’ve increased ours from 1 to 2.your client_private.key here with your own client_private.key,Under [Peer]
your server_public.key here with your own server_public.key,Endpoint : replace your server public ip with your ownIt should look as such with your own values added to fields with blue underline.

Save the file: Ctrl+O, then Enter to save filename, and exit: Ctrl+X.
Set the right permissions for your configuration file wg0.conf, hence making it secure.
sudo chmod 600 /etc/wireguard/wg0.conf
We will now add the client public key and IP to the server using the following syntax:
sudo wg set wg0 peer client_public.key allowed-ips client_ip_address/32,fd86:ea04:1111::2/128
To do this, go to the server and run the command below with your own client_public.key and client_ip_address inserted. As an example, it will look like this:
sudo wg set wg0 peer gDf++kLs3zl7DcGiIjzdkZiLOIEbV69Y8hnjPnqcpQM= allowed-ips 10.10.0.2/32,fd86:ea04:1111::2/128
To confirm the addition, run the following command on the server.
sudo wg
Output

interface: wg0
  public key: JBzWtHi9fGCfCcSs8e59tQ0Pwam16PeMVN2+SVhaL0k=
  private key: (hidden)
  listening port: 51820

peer: gDf++kLs3zl7DcGiIjzdkZiLOIEbV69Y8hnjPnqcpQM=
  allowed ips: 10.10.0.2/32, fd86:ea04:1111::2/128
This shows that we have successfully added the peer.
We will now start the interface on the client using the wg-quick command.
Before you start the client interface, if your client machine is also a server, bringing up the wg0 interface will cause you to lose SSH access to your client machine.
To ensure your command completes, run the following:
sudo apt -y install screen
sudo screen
Press spacebar twice, you should now be in a /home/ directory
Now start the interface on the client machine
sudo wg-quick up wg0
If you get an error about missing resolvconf
Output

[#] resolvconf -a wg0 -m 0 -x
/usr/bin/wg-quick: line 32: resolvconf: command not found
install it using the command below, and then try to start the interface again.
sudo apt install resolvconf
This will give the following output:
Output

[#] ip link add wg0 type wireguard
[#] wg setconf wg0 /dev/fd/63
[#] ip -4 address add 10.10.0.2/32 dev wg0
[#] ip -6 address add fd86:ea04:1111::2/128 dev wg0
[#] ip link set mtu 1420 up dev wg0
[#] ip -6 route add ::/0 dev wg0 table 51820
[#] ip -6 rule add not fwmark 51820 table 51820
[#] ip -6 rule add table main suppress_prefixlength 0
[#] ip6tables-restore -n
[#] ip -4 route add 0.0.0.0/0 dev wg0 table 51820
[#] ip -4 rule add not fwmark 51820 table 51820
[#] ip -4 rule add table main suppress_prefixlength 0
[#] sysctl -q net.ipv4.conf.all.src_valid_mark=1
[#] iptables-restore -n
You can check the status of the interface using the wg command
On the server
sudo wg

On the client machine
If your client machine is also a server, you’ve lost SSH access and will now need to SSH from your server to the client machine via the IP address you assigned it in the client config file above.
We assigned our client the IP 10.10.0.2. So now we have to
ssh clientserver@10.10.0.2
Now run
sudo wg

To see if the client can ping the server run ping followed by your server IP you assigned it in the server config file:
ping 10.10.0.1
Output

PING 10.10.0.1 (10.10.0.1) 56(84) bytes of data.
64 bytes from 10.10.0.1: icmp_seq=1 ttl=64 time=0.961 ms
64 bytes from 10.10.0.1: icmp_seq=2 ttl=64 time=0.785 ms
64 bytes from 10.10.0.1: icmp_seq=3 ttl=64 time=0.619 ms
64 bytes from 10.10.0.1: icmp_seq=4 ttl=64 time=0.862 ms
64 bytes from 10.10.0.1: icmp_seq=5 ttl=64 time=0.643 ms
64 bytes from 10.10.0.1: icmp_seq=6 ttl=64 time=0.743 ms
64 bytes from 10.10.0.1: icmp_seq=7 ttl=64 time=0.670 ms
64 bytes from 10.10.0.1: icmp_seq=8 ttl=64 time=0.815 ms
^C
--- 10.10.0.1 ping statistics ---
8 packets transmitted, 8 received, 0% packet loss, time 7074ms
rtt min/avg/max/mdev = 0.619/0.762/0.961/0.111 ms
This shows that we have successfully added the peer to the server and established a connection. Note that you can turn the interfaces on and off using
sudo wg-quick up wg0
to enable and
sudo wg-quick down wg0
to disable.
To enable WireGuard on system boot, run the command below on both the server and the client.
sudo systemctl enable wg-quick@wg0
If your client machine is also a server, and you now have to SSH to it via your server using the client config IP, use the exit command to exit the client machine session and return to your server terminal.
Download the WireGuard installer for Windows and install it on your Windows machine.
Once complete, the WireGuard client window will open.

Give it a name.
Your client public and private keys will already be generated and inserted for you.

Add the configuration text below with your own values in Address, PublicKey and Endpoint fields.
Address = 10.10.0.2/32, fd86:ea04:1111::2/128
DNS = 1.1.1.1

[Peer]
PublicKey = your server_public.key here
AllowedIPs = 0.0.0.0/0, ::/0
Endpoint = your server public ip:51820
Address = 10.10.0.2/32 this must be in the same IP subnet as your server is, but the IP cannot be exactly the same. For example: increase the last digit before the prefix /32 by 1. We’ve increased ours from 1 to 2.
PublicKey is the server_public.key you generated on your Debian VPN server. Obtain it by running the cat command on the server.
sudo cat /etc/wireguard/server_public.key
Then return to the client machine and insert the value in the PublicKey field.
Lastly, add your server’s public IP in Endpoint field.
It should look as below, with your own values added above the gold underline:

Block untunneled traffic (kill-switch) will automatically be ticked, leave as is.
Click Save
Now, you need to add the Windows client Public key and IP address to the server.
Your Windows client Public key will be here:

Run the command below after replacing client public key in the command below with your client Public key, and 10.10.0.2 with your own IP you just set in the client tunnel config.
sudo wg set wg0 peer client public key allowed-ips 10.10.0.2
There won’t be an output. Proceed to step 4.
Click Activate on the Windows client machine.
If successful, the client becomes Active, and you will start seeing received and sent traffic.

Run the following commands and type y when prompted and wait for installations to return Complete!
sudo yum update
sudo yum install epel-release https://www.elrepo.org/elrepo-release-7.el7.elrepo.noarch.rpm
sudo yum install yum-plugin-elrepo
sudo yum install kmod-wireguard wireguard-tools
Output

Installed:
  wireguard-tools.x86_64 0:1.0.20210914-1.el7

Complete!
Create the WireGuard directory.
sudo mkdir -p /etc/wireguard/
If running as a sudo user you may not have access to the WireGuard directory.
Use the following command to grant access to the logged-in user.
sudo chmod go+rx /etc/wireguard/
To generate key pair, run
sudo wg genkey | sudo tee /etc/wireguard/client_private.key | wg pubkey | sudo tee /etc/wireguard/client_public.key
This will generate the keys, save them in the WireGuard directory, and return your client public key:
Output

9uJZnN2duYxuSo3OJBbF2BNvt2W7J5g+1jhwP9x/83A=
You can use the cat command to view the keys.
Run the following command to return your client private key:
sudo cat /etc/wireguard/client_private.key
Copy and paste both these keys temporarily in someplace secure outside of your terminal, you’ll need them again below. (Don’t forget to delete it once added)
In this step, we will create the configuration file /etc/wireguard/wg0.conf on the client device. Please note that the file name and location are similar to that in the server and the only difference is the contents.
You will need to replace the text fields PrivateKey, PublicKey, and Endpoint with your own values.
PublicKey is the server_public.key on the VPN server. Obtain it by using the cat command from anywhere on the server by specifying the full file path:
sudo cat /etc/wireguard/server_public.key
Or run the command from the server’s WireGuard directory
sudo cd /etc/wireguard/
sudo cat server_public.key
Output

JBzWtHi9fGCfCcSs8e59tQ0Pwam16PeMVN2+SVhaL0k=
Now, we will use Vim text editor to create the config file. If you don’t have it installed on your client machine yet, run this command:
sudo yum install vim -y
Output

Installed:
  vim-enhanced.x86_64 2:7.4.629-8.el7_9

Dependency Installed:
  gpm-libs.x86_64 0:1.20.7-6.el7           perl.x86_64 4:5.16.3-299.el7_9
  perl-Carp.noarch 0:1.26-244.el7          perl-Encode.x86_64 0:2.51-7.el7
  perl-Exporter.noarch 0:5.68-3.el7        perl-File-Path.noarch 0:2.09-2.el7
  perl-File-Temp.noarch 0:0.23.01-3.el7    perl-Filter.x86_64 0:1.49-3.el7
  perl-Getopt-Long.noarch 0:2.40-3.el7     perl-HTTP-Tiny.noarch 0:0.033-3.el7
  perl-PathTools.x86_64 0:3.40-5.el7       perl-Pod-Escapes.noarch 1:1.04-299.el7_9
  perl-Pod-Perldoc.noarch 0:3.20-4.el7     perl-Pod-Simple.noarch 1:3.28-4.el7
  perl-Pod-Usage.noarch 0:1.63-3.el7       perl-Scalar-List-Utils.x86_64 0:1.27-248.el7
  perl-Socket.x86_64 0:2.010-5.el7         perl-Storable.x86_64 0:2.45-3.el7
  perl-Text-ParseWords.noarch 0:3.29-4.el7 perl-Time-HiRes.x86_64 4:1.9725-3.el7
  perl-Time-Local.noarch 0:1.2300-2.el7    perl-constant.noarch 0:1.27-2.el7
  perl-libs.x86_64 4:5.16.3-299.el7_9      perl-macros.x86_64 4:5.16.3-299.el7_9
  perl-parent.noarch 1:0.225-244.el7       perl-podlators.noarch 0:2.5.1-3.el7
  perl-threads.x86_64 0:1.87-4.el7         perl-threads-shared.x86_64 0:1.43-6.el7
  vim-common.x86_64 2:7.4.629-8.el7_9      vim-filesystem.x86_64 2:7.4.629-8.el7_9

Complete!
Now, run
sudo vim /etc/wireguard/wg0.conf
This will open a blank text file in Vim editor that we will use as our configuration file.
To paste/edit text in Vim, press I to enter --INSERT-- mode. Now add the configuration text below.
[Interface]
Address = 10.10.0.2/24
Address = fd86:ea04:1111::2/128
SaveConfig = true
PrivateKey = your client_private.key here
DNS = 1.1.1.1

[Peer]
PublicKey = your server_public.key here
Endpoint = your server public ip:51820
AllowedIPs = 0.0.0.0/0, ::/0
NOTE:
Under [Interface]
Address = 10.10.0.2/24 this must be in the same IP subnet as your server is, but the IP cannot be exactly the same. For example: increase the last digit before the prefix /24 by 1. We’ve increased ours from 1 to 2.your client_private.key here with your own client_private.key,Under [Peer]
your server_public.key here with your own server_public.key,Endpoint : replace your server public ip with your ownUse arrow keys to navigate to text and retype.
It should look as such with your own values added to fields with blue underline.

Press Esc to exit INSERT mode, then press Shift + ZZ to save changes and quit.
Set the right permissions for your configuration file wg0.conf hence making it secure.
sudo chmod 600 /etc/wireguard/wg0.conf
We will now add the client public key and IP address to the server using the following syntax.
sudo wg set wg0 peer client_public.key allowed-ips client_ip_address/32,fd86:ea04:1111::2/128
To do this, go to the server and change into the WireGuard directory
sudo cd /etc/wireguard/
Now run the command below with your own client_public.key inserted. As an example, it will look like this:
sudo wg set wg0 peer 9uJZnN2duYxuSo3OJBbF2BNvt2W7J5g+1jhwP9x/83A= allowed-ips 10.10.0.2/32,fd86:ea04:1111::2/128
To confirm the addition, while still on the server, run the following command:
sudo wg
Output

This shows that we have successfully added the peer.
We will now start the interface on the client using the wg-quick command.
Before you start the interface, note that if your client machine is also a server, bringing up the wg0 interface will cause you to lose SSH access to your client machine.
To ensure your command completes, run the following:
sudo yum -y install screen
sudo screen
Press spacebar twice, you should now be in a /home/ directory
Now start the interface on the client machine
sudo wg-quick up wg0
This will give the following output;
Output

[#] ip link add wg0 type wireguard
[#] wg setconf wg0 /dev/fd/63
[#] ip -4 address add 10.10.0.2/24 dev wg0
[#] ip -6 address add fd86:ea04:1111::2/128 dev wg0
[#] ip -6 address add fe80::9582:2edf:1c90:48a4/64 dev wg0
[#] ip -6 address add fe80::f8f9:54e6:8964:c300/64 dev wg0
[#] ip -6 address add fe80::5286:1739:7ed1:30c/64 dev wg0
[#] ip -6 address add fe80::76b9:af75:4786:5ad6/64 dev wg0
[#] ip link set mtu 1420 up dev wg0
[#] ip -6 route add ::/0 dev wg0 table 51820
[#] ip -6 rule add not fwmark 51820 table 51820
[#] ip -6 rule add table main suppress_prefixlength 0
[#] ip6tables-restore -n
[#] ip -4 route add 0.0.0.0/0 dev wg0 table 51820
[#] ip -4 rule add not fwmark 51820 table 51820
[#] ip -4 rule add table main suppress_prefixlength 0
[#] sysctl -q net.ipv4.conf.all.src_valid_mark=1
[#] iptables-restore -n
When both server and client interfaces are up, you can check the status using the wg command.
On the server
sudo wg

On the client machine
If your client machine is also a server, you’ve lost SSH access and will now need to SSH from your server to the client machine via the IP address you assigned it in the config file above.
We assigned our client machine the IP 10.10.0.2. So now we have to
ssh clientserver@10.10.0.2
Now run
sudo wg

This shows that we have successfully added the peer to the server and established a connection.
Note that you can turn the interfaces on and off using
sudo wg-quick up wg0
to enable and
sudo wg-quick down wg0
to disable.
To enable the WireGuard on system boot, run the command below on both the server and the client.
sudo systemctl enable wg-quick@wg0
If your client machine is also a server, and you now have to SSH to it using the config IP via your server, use the exit command twice to exit the client machine screen session and client machine to return to your server terminal.
For most operating systems, the installation process for the WireGuard is the same for both the server and client.
You’ll start by installing WireGuard on your client machine (can be your PC, another server, etc), after which you’ll generate the key pair for the client and finally, do the configuration.
Update client machine system
sudo apt update; sudo apt upgrade
Now install WireGuard
sudo apt install wireguard -y
Restart client machine and confirm that it is working
sudo modprobe wireguard
lsmod | grep wireguard
If successful, it will give the output below.
Output

wireguard             221184  0
ip6_udp_tunnel         16384  1 wireguard
udp_tunnel             16384  1 wireguard
If running as a sudo user you may not have access to the WireGuard directory. Use the following command to grant access to the logged-in user.
sudo chmod go+rx /etc/wireguard
cd /etc/wireguard
Run the following to generate the VPN client keys;
umask 077
sudo wg genkey | sudo tee client_private.key | sudo wg pubkey | sudo tee client_public.key
This will generate the keys, save them in the WireGuard directory, and return your client public key:
Output

gDf++kLs3zl7DcGiIjzdkZiLOIEbV69Y8hnjPnqcpQM=
You can use the cat command to view the keys.
Run the following command to return your client private key:
sudo cat client_private.key
Output

eIjXbij7EntYxoOfxvdGf6FN+DnincRhIZGdzTMyTkA=
Copy and paste both these keys in someplace secure outside of your terminal, you’ll need them again below. (Don’t forget to delete it once added)
The process is similar to that of the server apart from the information in the configuration files. We will call our interface wg0 and use the configuration file to define the private network, our client private key, and the server’s public key and IP address.
You will need to add your own values to the PrivateKey, PublicKey, and Endpoint fields in the code block further down.
PublicKey is the server_public.key on the VPN server. Go to the server and obtain the key by running the cat command:
sudo cat /etc/wireguard/server_public.key
Output

JBzWtHi9fGCfCcSs8e59tQ0Pwam16PeMVN2+SVhaL0k=
Copy and paste this key in someplace secure outside of your terminal, you’ll need to add it to the config file below. (Don’t forget to delete it once added)
Now we will create the client configuration file.
Vim text editor should come installed with Ubuntu 18, but if you don’t have it installed on your client machine yet, run this command:
sudo apt install vim
Now run
sudo vim /etc/wireguard/wg0.conf
This will open a blank text file in Vim editor that we will use as our client configuration file.
To paste/edit text in Vim, press I to enter --INSERT-- mode. Now add the configuration text below.
[Interface]
Address = 10.10.0.2/32
Address = fd86:ea04:1111::2/128
SaveConfig = true
PrivateKey = your client_private.key here
DNS = 1.1.1.1

[Peer]
PublicKey = your server_public.key here
Endpoint = your server public ip:51820
AllowedIPs = 0.0.0.0/0, ::/0
Use arrow keys to navigate to text and retype.
NOTE:
Under [Interface]
Address = 10.10.0.2/32 this must be in the same IP subnet as your server is, but the IP cannot be exactly the same. For example: increase the last digit before the prefix /24 by 1. We’ve increased ours from 1 to 2.your client_private.key here with your own client_private.key,Under [Peer]
your server_public.key here with your own server_public.key,Endpoint : replace your server public ip with your ownIt should look as such with your own values added to fields with blue underline.

Press Esc to exit INSERT mode, then press Shift + ZZ to save changes and quit.
Set the right permissions for your configuration file wg0.conf, hence making it secure.
sudo chmod 600 /etc/wireguard/wg0.conf
We will now add the client public key and IP to the server using the following syntax:
sudo wg set wg0 peer client_public.key allowed-ips client_ip_address/32,fd86:ea04:1111::2/128
To do this, go to the server and run the command below with your own client_public.key and client_ip_address inserted. As an example, it will look like this:
sudo wg set wg0 peer gDf++kLs3zl7DcGiIjzdkZiLOIEbV69Y8hnjPnqcpQM= allowed-ips 10.10.0.2/32,fd86:ea04:1111::2/128
To confirm the addition, run the following command on the server.
sudo wg
Output

interface: wg0
  public key: JBzWtHi9fGCfCcSs8e59tQ0Pwam16PeMVN2+SVhaL0k=
  private key: (hidden)
  listening port: 51820

peer: gDf++kLs3zl7DcGiIjzdkZiLOIEbV69Y8hnjPnqcpQM=
  allowed ips: 10.10.0.2/32, fd86:ea04:1111::2/128
This shows that we have successfully added the peer.
We will now start the interface on the client using the wg-quick command.
Before you start the client interface, if your client machine is also a server, bringing up the wg0 interface will cause you to lose SSH access to your client machine.
To ensure your command completes, run the following:
sudo apt -y install screen
sudo screen
Press spacebar twice, you should now be in a /home/ directory
Now start the interface on the client machine
sudo wg-quick up wg0
If you get an error about missing resolvconf
Output

[#] resolvconf -a wg0 -m 0 -x
/usr/bin/wg-quick: line 32: resolvconf: command not found
install it using the command below, and then try to start the interface again.
sudo apt install resolvconf
The started interface will give the following output:
Output

[#] ip link add wg0 type wireguard
[#] wg setconf wg0 /dev/fd/63
[#] ip -4 address add 10.10.0.2/32 dev wg0
[#] ip -6 address add fd86:ea04:1111::2/128 dev wg0
[#] ip link set mtu 1420 up dev wg0
[#] ip -6 route add ::/0 dev wg0 table 51820
[#] ip -6 rule add not fwmark 51820 table 51820
[#] ip -6 rule add table main suppress_prefixlength 0
[#] ip6tables-restore -n
[#] ip -4 route add 0.0.0.0/0 dev wg0 table 51820
[#] ip -4 rule add not fwmark 51820 table 51820
[#] ip -4 rule add table main suppress_prefixlength 0
[#] sysctl -q net.ipv4.conf.all.src_valid_mark=1
[#] iptables-restore -n
You can check the status of the interface using the wg command
On the server
sudo wg
On the client machine
If your client machine is also a server, you’ve lost SSH access and will now need to SSH from your server to the client machine via the IP address you assigned it in the client config file above.
We assigned our client the IP 10.10.0.2. So now we have to
ssh clientserver@10.10.0.2
Now run
sudo wg
To see if the client can ping the server run ping followed by your server IP you assigned it in the server config file:
ping 10.10.0.1
Output

PING 10.10.0.1 (10.10.0.1) 56(84) bytes of data.
64 bytes from 10.10.0.1: icmp_seq=1 ttl=64 time=0.961 ms
64 bytes from 10.10.0.1: icmp_seq=2 ttl=64 time=0.785 ms
64 bytes from 10.10.0.1: icmp_seq=3 ttl=64 time=0.619 ms
64 bytes from 10.10.0.1: icmp_seq=4 ttl=64 time=0.862 ms
64 bytes from 10.10.0.1: icmp_seq=5 ttl=64 time=0.643 ms
64 bytes from 10.10.0.1: icmp_seq=6 ttl=64 time=0.743 ms
64 bytes from 10.10.0.1: icmp_seq=7 ttl=64 time=0.670 ms
64 bytes from 10.10.0.1: icmp_seq=8 ttl=64 time=0.815 ms
^C
--- 10.10.0.1 ping statistics ---
8 packets transmitted, 8 received, 0% packet loss, time 7074ms
rtt min/avg/max/mdev = 0.619/0.762/0.961/0.111 ms
This shows that we have successfully added the peer to the server and established a connection. Note that you can turn the interfaces on and off using
sudo wg-quick up wg0
to enable and
sudo wg-quick down wg0
to disable.
To enable WireGuard on system boot, run the command below on both the server and the client.
sudo systemctl enable wg-quick@wg0
If your client machine is also a server, and you now have to SSH to it via your server using the client config IP, use the exit command to exit the client machine session and return to your server terminal.
Now you should be all set up. We hope this helped.
Happy hosting!

Iptables is a firewall utility in Linux that lets you define granular IP packet filter rules for your server.

Grep is a powerful Linux command that lets you search for strings and expressions, across files and directories.

You only need to know a small subset of commands to become a proficient Linux administrator. In this article, we'll be sharing 100+ Linux commands.