Est. reading time: 5 minutes

Dedicated Servers
High-performance, bare-metal, dedicated servers with root, IPMI and RMM access.
Container VPS Hosting
Virtual servers give you the dedicated server experience affordably.
Linux Virtual Machines
Cloud-based Linux virtual machines powered by KVM.
Windows Cloud Servers
Windows virtual server hosting within the cloud for fast reliable connectivity.
Managed cPanel Servers
Managed cPanel cloud server hosting with priority support and daily backups.
Managed Colocation New!
Secure hosting for your critical infrastructure.
Accounting Software Hosting New!
Efficient, cloud-based hosting for accounting software.
Web Hosting
Take your idea or business online today with our shared web hosting solutions.
Email Hosting
Let your customers know they are dealing with a legitimate business by using a custom email address.
Site Builder
Build your own website online with our easy drag and drop website builder.
LiteSpeed Hosting
Accelerated LiteSpeed hosting with improved performance for your website, blog or online shop.
WordPress Hosting
Build your WordPress website with thousands of plugins and themes to choose from.
Register a domain
Search for and register your domain today.
Transfer your domain
Transfer your existing domain to us.
Domain prices
View prices for all domain registrations, renewals and transfers.
WHOIS Lookup
Lookup every single domain currently registered in the world.
VPS Reseller
Becoming a VPS reseller is a great way to earn money.
Reseller Web Hosting (WHM)
A great way to earn money and build your own web hosting company.
LiteSpeed Hosting Reseller
Advanced server-side caching to accelerate your LiteSpeed enabled websites
Domain Resellers
Resell Domains and profit from our large reseller rebates.
Acronis Online Backup Reseller
Become an Acronis online backup reseller to maximize your revenue.
Login
Log in to your personal HOSTAFRICA account
Register
Don't have an account yet ? Create a new one
Forgot Password?
Recover your account password
Move to HOSTAFRICA
Free cPanel to cPanel and domain name transfers with any new plan!
Announcements
All the latest from HOSTAFRICA
Knowledgebase
Browse our knowledge base to get help immediately.
Network Status
Network issues & scheduled maintenances
Contact us
Need other help with your HOSTAFRICA account?
Blog
Find our latest news, guides and tutorials here.
Docker provides a flexible, portable, and self-sufficient environment where developers can create, deploy, and manage applications on the cloud or on-premise. Managing the docker images can be a challenge and time consuming especially when working with a large number of images and containers. The good thing is that there are various tools such as Portainer that can ease the workload.
Portainer is an open-source lightweight graphical interface solution that allows you to easily manage your Docker containers. The web browser-based UI is powerful, easy to install, and uses the Docker environment management tool that helps you to quickly pull images, add containers, deploy applications, add network, and perform other tasks.
The flexible tool supports Windows, Linux, and Mac OS operating systems. Moreover, you can increase its functionalities by adding other low cost and simple-to-integrate extensions. Generally, it works as a Docker container while consuming very few resources. As such, you need to first install Docker and then Portainer.
In this article, we will begin by installing Docker on Ubuntu 18.04, and once done, we will continue and set up Portainer. Although we are using these steps on Ubuntu 18.04, they are applicable to other versions such as 19.04 and 20.04.
Prerequisites
Log in to your remote HOSTAFRICA Linux Virtual Machine using an authorized sudo account. In this tutorial, our sudo username is
support
and the virtual machine hostname is
hostafrica
Before installing Docker, let us start by updating the packages database.
sudo apt-get update
In the next step, we will issue a command that ensures apt will transfer files only over HTTPS connections.
sudo apt install apt-transport-https ca-certificates curl software-properties-common
Type Y and press enter to continue with the installation.
After it is complete, add the official Docker GPG key. This validates that the installation packages are genuine and that they are coming from the official Docker repository.
curl -fsSL https://download.docker.com/linux/ubuntu/gpg | sudo apt-key add -
Ensure that it returns an OK.

We will now add the Docker repository to apt sources.
sudo add-apt-repository "deb [arch=amd64] https://download.docker.com/linux/ubuntu $(lsb_release -cs) stable"
Once the process is complete, we are now ready to install the Docker engine.
Before proceeding, update the packages list with the Docker from the newly added repository.
sudo apt update
To install the latest version of Docker engine, run
sudo apt install docker-ce
After a while, you will receive a prompt to accept the installation.
Type Y to continue and wait for the installation to complete.
To confirm the successful Docker installation and whether it is active and running, use the command;
sudo systemctl status docker
If installed properly, you will receive the following output.

The above output indicates that Docker is successfully installed, active, and running. It is now time to install the Portainer. However, if Docker is not running, use the following two commands to start it and also ensure that it loads automatically whenever the machine boots.
sudo systemctl start docker
sudo systemctl enable docker
Portainer is a container whose setup is simply a pull, but not a complex installation. To proceed, open a terminal window with and run the following commands using an account with sudo privileges.
Start by creating a volume outside of the scope of other containers.
sudo docker volume create portainer_data
The next step instructs the Portainer container to run at port 9000. Please note that you will need to open the port to access the Portainer portal via a web browser. Also, we will include the restart =always option that instructs docker to start the container whenever it stops. If not specified you will have to start the Portainer manually.
To proceed, issue the command:
sudo docker run -d -p 8000:8000 -p 9000:9000 --name=portainer --restart=always -v /var/run/docker.sock:/var/run/docker.sock -v portainer_data:/data portainer/portainer
This will install the Portainer server on the Ubuntu system. The above command will pull and install the Portainer on your HOSTAFRICA Linux VM. If successful, you will see the following output.

To access Portainer on your browser, you will need to ensure that the port 9000 on the Docker Engine is open. To find out its status, run;
sudo ufw status
If the firewall is inactive, you will get the output as below; otherwise it will show Active and open ports, if any.

If inactive, enable the firewall using the command;
sudo ufw enable
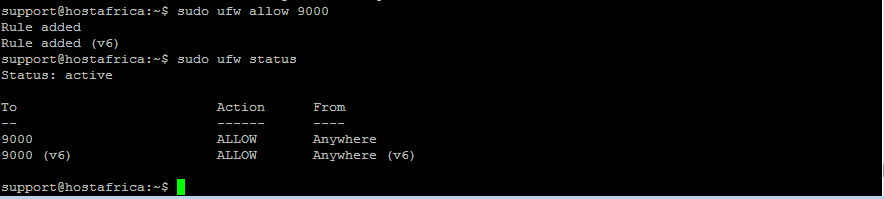
We will now open the port 9000
sudo ufw allow 9000
Check the status again and ensure that the firewall is active and there is ALLOW from Anywhere alongside port 9000. The output should look like below. However, you may see more ports if there are others that are open for other applications.
Although the Portainer should ideally start automatically when the machine boots, you can still control it manually. Use the following Docker commands to manually start or stop the Portainer service.
To start Portainer
sudo docker start portainer
To stop
sudo docker stop portainer
With Docker and Portainer running, and port 9000 open you can now access the portal on a web browser.
Open your computer’s web browser and type the IP address of your HOSTAFRICA VM (VM public IP address), followed by port 9000.
It will look like this:
http://vm_ip_address:9000 or http://xxx.xxx.xxx.xxx:9000
This will open the Portainer login page and request you to create the administrator username and password.

Type in a new password, confirm, and then click Create user. This will open the next screen that gives you the option to connect to a Docker environment. You can connect to a local or remote environment, an agent, or an Azure ACI.

From here, you can now perform other Docker management tasks such as adding or removing stacks, containers, images, networks, and volumes. Also, the portal provides you with the option to configure other settings add or remove users, change the roles etc.

Portainer is a powerful and easy-to-setup graphical user interface that allows you to easily manage your Docker environment. We have provided you with all the steps required to set up Docker and Portainer on your HOSTAFRICA Linux VM.
Should you have another distribution of Linux you wish to install Docker on, visit our guide on “How to Install Docker on Linux and Windows”
Happy hosting

Learn how to install Tailscale VPN on Linux and Windows. This comprehensive guide has everything you need to get started!

Learn how to install Kubernetes and deploy a cluster with Docker on Debian 9. Step by step instructions with commands and images.

Learn how to install Kubernetes and deploy a cluster on a Windows server. Step by step instructions with commands and images.