Est. reading time: 7 minutes

Dedicated Servers
High-performance, bare-metal, dedicated servers with root, IPMI and RMM access.
Container VPS Hosting
Virtual servers give you the dedicated server experience affordably.
Linux Virtual Machines
Cloud-based Linux virtual machines powered by KVM.
Windows Cloud Servers
Windows virtual server hosting within the cloud for fast reliable connectivity.
Managed cPanel Servers
Managed cPanel cloud server hosting with priority support and daily backups.
Managed Colocation New!
Secure hosting for your critical infrastructure.
Accounting Software Hosting New!
Efficient, cloud-based hosting for accounting software.
Web Hosting
Take your idea or business online today with our shared web hosting solutions.
Email Hosting
Let your customers know they are dealing with a legitimate business by using a custom email address.
Site Builder
Build your own website online with our easy drag and drop website builder.
LiteSpeed Hosting
Accelerated LiteSpeed hosting with improved performance for your website, blog or online shop.
WordPress Hosting
Build your WordPress website with thousands of plugins and themes to choose from.
Register a domain
Search for and register your domain today.
Transfer your domain
Transfer your existing domain to us.
Domain prices
View prices for all domain registrations, renewals and transfers.
WHOIS Lookup
Lookup every single domain currently registered in the world.
VPS Reseller
Becoming a VPS reseller is a great way to earn money.
Reseller Web Hosting (WHM)
A great way to earn money and build your own web hosting company.
LiteSpeed Hosting Reseller
Advanced server-side caching to accelerate your LiteSpeed enabled websites
Domain Resellers
Resell Domains and profit from our large reseller rebates.
Acronis Online Backup Reseller
Become an Acronis online backup reseller to maximize your revenue.
Login
Log in to your personal HOSTAFRICA account
Register
Don't have an account yet ? Create a new one
Forgot Password?
Recover your account password
Move to HOSTAFRICA
Free cPanel to cPanel and domain name transfers with any new plan!
Announcements
All the latest from HOSTAFRICA
Knowledgebase
Browse our knowledge base to get help immediately.
Network Status
Network issues & scheduled maintenances
Contact us
Need other help with your HOSTAFRICA account?
Blog
Find our latest news, guides and tutorials here.
Kubernetes has become the go-to platform to build, manage, and scale IT infrastructures.
Using a few YAML configuration files, you can create a self-sufficient cluster with application pods distributed across various nodes. Kubernetes ensures that pods restart in case they crash, scale up in times of high traffic, and migrate to a different node, if the original one goes down.
In this article, we’ll walk you through the steps to deploy a Kubernetes cluster on two Debian 11 machines using Containerd.
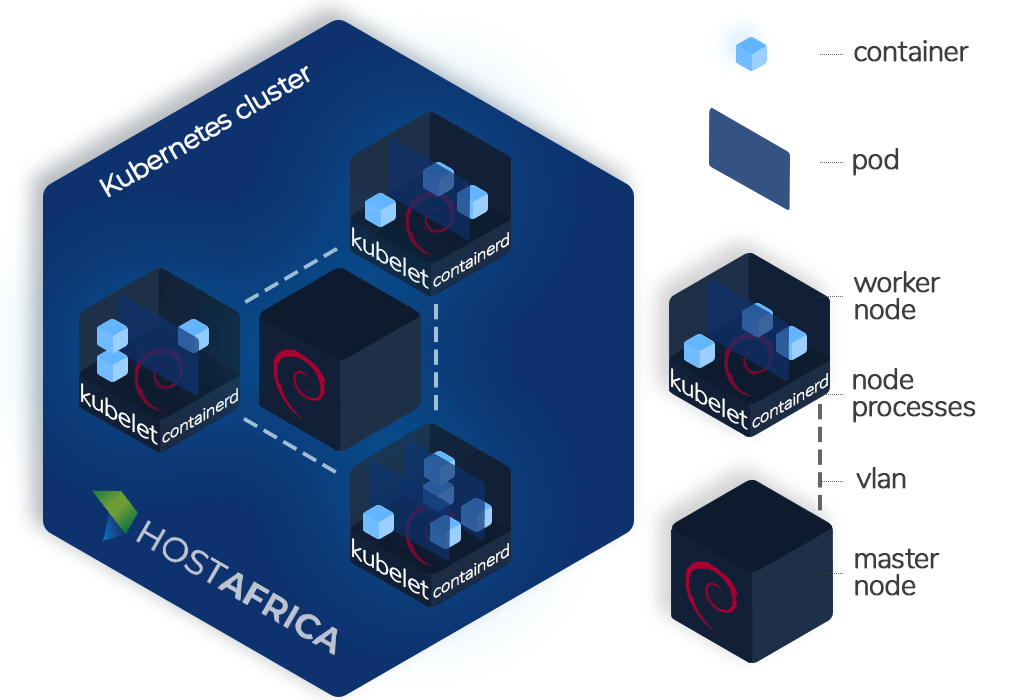
A Kubernetes cluster comprises a master node, and at-least one or more worker nodes.
The master node is the virtual machine (VM) that oversees the administration and management of the entire cluster. It’s responsible to distribute workload across different workers nodes.
The worker nodes are VMs that actually host your containerized applications. It’s recommended to only use VMs (aka cloud servers) to run a Kubernetes cluster, and not system containers (aka VPS), as the latter may pose scalability issues.
Every worker node is made up of:
This doesn’t mean that your container images built with Docker will no longer run inside a Kubernetes cluster.
Containers are lightweight software packages that contain all the dependencies required to run an application in an isolated environment; nothing more, nothing less.
The most popular containerization platform is Docker. Kubernetes creates groups of containers, known as pods, which are its most fundamental building blocks. Pods can communicate with other pods, the kube-apiserver, and with the outside world.
To set up a Kubernetes cluster, you will have to install three code modules (and all their dependencies): Kubelet, kubeadm, and kubectl, on every node. But before we do that, we will install Containerd (our container runtime), on all the nodes.
For the purpose of this article, we will create a Kubernetes cluster with 2 Debian 11 nodes: 1 master, 1 worker. Let’s begin!
Execute these commands on all the nodes to install Containerd:
cat <<EOF | sudo tee /etc/modules-load.d/containerd.conf
overlay
br_netfilter
EOF
sudo modprobe overlay
sudo modprobe br_netfilter
cat <<EOF | sudo tee /etc/sysctl.d/99-kubernetes-cri.conf
net.bridge.bridge-nf-call-iptables = 1
net.ipv4.ip_forward = 1
net.bridge.bridge-nf-call-ip6tables = 1
EOF
sudo sysctl --system
sudo apt-get update
sudo apt-get -y install containerd
Successful installation should yield the following output:
Reading package lists… Done
Building dependency tree… Done
Reading state information… Done
The following additional packages will be installed:
runc
Suggested packages:
containernetworking-plugins
Recommended packages:
criu
The following NEW packages will be installed:
containerd runc
0 upgraded, 2 newly installed, 0 to remove and 23 not upgraded.
Need to get 20.9 MB/23.3 MB of archives.
After this operation, 96.2 MB of additional disk space will be used.
Get:1 http://deb.debian.org/debian bullseye/main amd64 containerd amd64 1.4.12~ds1-1~deb11u1 [20.9 MB]
Fetched 20.9 MB in 3s (7,397 kB/s)
Selecting previously unselected package runc.
(Reading database … 29290 files and directories currently installed.)
Preparing to unpack …/runc_1.0.0~rc93+ds1-5+b2_amd64.deb …
Unpacking runc (1.0.0~rc93+ds1-5+b2) …
Selecting previously unselected package containerd.
Preparing to unpack …/containerd_1.4.12~ds1-1~deb11u1_amd64.deb …
Unpacking containerd (1.4.12~ds1-1~deb11u1) …
Setting up runc (1.0.0~rc93+ds1-5+b2) …
Setting up containerd (1.4.12~ds1-1~deb11u1) …
Created symlink /etc/systemd/system/multi-user.target.wants/containerd.service → /lib/systemd/system/containerd.service.
Processing triggers for man-db (2.9.4-2) …
sudo mkdir -p /etc/containerd
containerd config default | sudo tee /etc/containerd/config.toml
To set the cgroup driver to systemd, edit the configuration file:
vi /etc/containerd/config.toml
Find the following section: [plugins."io.containerd.grpc.v1.cri".containerd.runtimes.runc.options]
And set the value of SystemdCgroup to true
This is how your file should look after you are done:
[plugins."io.containerd.grpc.v1.cri".containerd.runtimes]
[plugins."io.containerd.grpc.v1.cri".containerd.runtimes.runc]
          runtime_type = "io.containerd.runc.v2"
          runtime_engine = ""
          runtime_root = ""
          privileged_without_host_devices = false
          base_runtime_spec = ""

[plugins."io.containerd.grpc.v1.cri".containerd.runtimes.runc.options]
          SystemdCgroup = true
Finally, restart Containerd to apply the configuration;
sudo systemctl restart containerd
To verify that Containerd is running, execute this command:
ps –ef | grep containerd
You should get an output like this:
root 16953 1 1 10:39 ? 00:00:00 /usr/bin/containerd
root 16968 16308 0 10:39 pts/0 00:00:00 grep containerd
Now that Containerd is installed on both our nodes, we can start our Kubernetes installation.
sudo apt-get install curl
curl -s https://packages.cloud.google.com/apt/doc/apt-key.gpg | sudo apt-key add
cat <<EOF | sudo tee /etc/apt/sources.list.d/kubernetes.list
deb https://apt.kubernetes.io/ kubernetes-xenial main
EOF
sudo apt-get update
sudo apt-get install -y kubelet kubeadm kubectl
On the master node, run:
sudo hostnamectl set-hostname "master-node"
exec bash
On the worker node, run:
sudo hostnamectl set-hostname "w-node1"
exec bash
Set the hostnames in the /etc/hosts file of the worker:
sudo cat <> /etc/hosts
160.119.248.60 master-node
160.119.248.162 node1 W-node1
EOF
Set up the following firewall rules on the master node
sudo ufw allow 6443/tcp
sudo ufw allow 2379/tcp
sudo ufw allow 2380/tcp
sudo ufw allow 10250/tcp
sudo ufw allow 10251/tcp
sudo ufw allow 10252/tcp
sudo ufw allow 10255/tcp
sudo ufw reload
Set up the following firewall rules on the worker node
sudo ufw allow 10251/tcp
sudo ufw allow 10255/tcp
sudo ufw reload
sudo swapoff –a
sudo systemctl enable kubelet
On the master node, execute the following command to initialise the Kubernetes cluster:
sudo kubeadm init
The process can take a few minutes. The last few lines of your output should look similar to this:
Your Kubernetes control-plane has initialized successfully!
To start using your cluster, you need to run the following as a regular user:
mkdir -p $HOME/.kube
sudo cp -i /etc/kubernetes/admin.conf $HOME/.kube/config
sudo chown $(id -u):$(id -g) $HOME/.kube/config
Alternatively, if you are the root user, you can run:
export KUBECONFIG=/etc/kubernetes/admin.conf
You should now deploy a pod network to the cluster.
Run "kubectl apply -f [podnetwork].yaml" with one of the options listed at:
https://kubernetes.io/docs/concepts/cluster-administration/addons/
Then you can join any number of worker nodes by running the following on each as root:
kubeadm join 160.119.248.60:6443 --token l5hlte.jvsh7jdrp278lqlr \
--discovery-token-ca-cert-hash sha256:07a3716ea4082fe158dce5943c7152df332376b39ea5e470e52664a54644e00a
Copy the kubeadm join from the end of the above output. We will be using this command to add worker nodes to our cluster.
If you forgot to copy, or misplaced the command, don’t worry; you can get it back by executing this command: sudo kubeadm token create –print-join-command
As indicated by the output above, we need to create a directory and claim its ownership to start managing our cluster.
Run the following commands:
mkdir -p $HOME/.kube
sudo cp -i /etc/kubernetes/admin.conf $HOME/.kube/config
sudo chown $(id -u):$(id -g) $HOME/.kube/config
We will use Flannel to deploy a pod network to our cluster:
kubectl apply -f https://raw.githubusercontent.com/coreos/flannel/master/Documentation/kube-flannel.yml
You should see the following output after running the above command:
podsecuritypolicy.policy/psp.flannel.unprivileged created
clusterrole.rbac.authorization.k8s.io/flannel created
clusterrolebinding.rbac.authorization.k8s.io/flannel created
serviceaccount/flannel created
configmap/kube-flannel-cfg created
daemonset.apps/kube-flannel-ds created
You should be able to verify that your master node is ready now:
sudo kubectl get nodes
Output
NAME          STATUS   ROLES                  AGE   VERSION
master-node   Ready    control-plane,master   90s   v1.23.3
…and that all the pods are up and running:
sudo kubectl get pods --all-namespaces
Output
NAMESPACE     NAME                                  READY   STATUS              RESTARTS        AGE
kube-system   coredns-64897985d-5r6zx               0/1     Running		0               22m
kube-system   coredns-64897985d-zplbs               0/1     Running		0               22m
kube-system   etcd-master-node                      1/1     Running             0               22m
kube-system   kube-apiserver-master-node            1/1     Running             0               22m
kube-system   kube-controller-manager-master-node   1/1     Running             0               22m
kube-system   kube-flannel-ds-brncs                 0/1     Running		0		22m
kube-system   kube-flannel-ds-vwjgc                 0/1     Running    		0     		22m
kube-system   kube-proxy-bvstw                      1/1     Running             0               22m
kube-system   kube-proxy-dnzmw                      1/1     Running             0               20m
kube-system   kube-scheduler-master-node            1/1     Running             0               22m
At this point, we are ready to add nodes to our cluster.
Copy the kubeadm join command from Step 1 and run it on the worker node:
kubeadm join 160.119.248.60:6443 --token l5hlte.jvsh7jdrp278lqlr \
--discovery-token-ca-cert-hash sha256:07a3716ea4082fe158dce5943c7152df332376b39ea5e470e52664a54644e00a
Output
This node has joined the cluster:
* Certificate signing request was sent to apiserver and a response was received.
* The Kubelet was informed of the new secure connection details.

Run 'kubectl get nodes' on the control-plane to see this node join the cluster.
To verify that the worker node indeed got added to the cluster, execute the following command on the master node:
kubectl get nodes
Output
NAME          STATUS   ROLES                  AGE     VERSION
master-node   Ready    control-plane,master   3m40s   v1.23.3
w-node1       Ready                     83s     v1.23.3
You can set the role for your worker node using:
sudo kubectl label node w-node1 node-role.kubernetes.io/worker=worker
Get nodes again to verify:
kubectl get nodes
Output
NAME          STATUS   ROLES                  AGE     VERSION
master-node   Ready    control-plane,master   5m12s   v1.23.3
w-node1       Ready    worker                 2m55s   v1.23.3
To add more nodes, repeat this Add nodes step on more machines.
That’s it! Your two node Kubernetes cluster is up and running!

Can't decide between a Virtual Private Server or Dedicated Server? Check out our detailed comparison & make the right choice for your website hosting

Ready to learn how to make your own dedicated server? From gathering resources to step-by-step setup, our guide empowers your DIY project. Get started!

In this guide, we'll walk you through the basics of using Putty to access your server easily and securely.