Est. reading time: 11 minutes

Dedicated Servers
High-performance, bare-metal, dedicated servers with root, IPMI and RMM access.
Container VPS Hosting
Virtual servers give you the dedicated server experience affordably.
Linux Virtual Machines
Cloud-based Linux virtual machines powered by KVM.
Windows Cloud Servers
Windows virtual server hosting within the cloud for fast reliable connectivity.
Managed cPanel Servers
Managed cPanel cloud server hosting with priority support and daily backups.
Managed Colocation New!
Secure hosting for your critical infrastructure.
Accounting Software Hosting New!
Efficient, cloud-based hosting for accounting software.
Web Hosting
Take your idea or business online today with our shared web hosting solutions.
Email Hosting
Let your customers know they are dealing with a legitimate business by using a custom email address.
Site Builder
Build your own website online with our easy drag and drop website builder.
LiteSpeed Hosting
Accelerated LiteSpeed hosting with improved performance for your website, blog or online shop.
WordPress Hosting
Build your WordPress website with thousands of plugins and themes to choose from.
Register a domain
Search for and register your domain today.
Transfer your domain
Transfer your existing domain to us.
Domain prices
View prices for all domain registrations, renewals and transfers.
WHOIS Lookup
Lookup every single domain currently registered in the world.
VPS Reseller
Becoming a VPS reseller is a great way to earn money.
Reseller Web Hosting (WHM)
A great way to earn money and build your own web hosting company.
LiteSpeed Hosting Reseller
Advanced server-side caching to accelerate your LiteSpeed enabled websites
Domain Resellers
Resell Domains and profit from our large reseller rebates.
Acronis Online Backup Reseller
Become an Acronis online backup reseller to maximize your revenue.
Login
Log in to your personal HOSTAFRICA account
Register
Don't have an account yet ? Create a new one
Forgot Password?
Recover your account password
Move to HOSTAFRICA
Free cPanel to cPanel and domain name transfers with any new plan!
Announcements
All the latest from HOSTAFRICA
Knowledgebase
Browse our knowledge base to get help immediately.
Network Status
Network issues & scheduled maintenances
Contact us
Need other help with your HOSTAFRICA account?
Blog
Find our latest news, guides and tutorials here.
So, you’re new around the web hosting block and you’re looking to familiarise yourself with the area. First you’ll want to focus on your control panel – cPanel. We’ll walk you through the ins and outs so you’re coming and going with ease.
cPanel can be pretty confusing if you’ve never worked with a web-based control panel before. Most guides are written for those with a web hosting background by tech gurus with little concern for the uninitiated. If, like many, you’re part of the latter, this guide is for you.
cPanel is a web-based control panel where you can manage everything you need to host a website. This includes convenient extras like email, FTP (File Transfer Protocol) accounts, and DNS (Domain Name Systems), and a pleasant graphical user interface to wrap it all up. It’s easy to keep up to date as long as you don’t try to modify the way it works or overload it with non-standard plugins.
This lucky packet of a control panel is the most straight-forward management system you’ll find. Its user-friendly interface makes it a breeze to operate, whether your OS is Windows-based or Linux-based.
With cPanel you can:
and a lot more advanced bells and whistles, plus some nifty security gadgets.
Once you’ve bought your cPanel hosting package from us, you’ll receive an email with login details for your cPanel site. This can be an IP address (e.g., 123.234.123.234:2083) or a domain name (i.e., https://yourdomain.co.za:2083).
After you navigate to this address with your browser, you’ll get the cPanel login page. Enter your username and password and your cPanel will pop right up. We’ve whipped out the magnifying glass for an even closer look, depending on whichever you prefer.
If you’re counting the valuable seconds spent on logging in, this is the method that’ll suit you best.
Log into cPanel directly via your URL (via browser).
cpanel.yourwebsite.com2083 appended to your domain or IP address. i.e., yourwebsite.com:2083 or 123.234.123.234:2083You might see the URL change. This is simply the name of the web server hosting your account. It’ll still take you to your own cPanel, so don’t be alarmed if you spot it.

Enter your login credentials you got in the welcome email after you made your payment.
If the CNAME Records (DNS Records) for your website doesn’t exist yet, you’ll have to use this port method to login.
Should you get the error: “Bad credentials”, please open a support ticket from your Client Area or send an email to support@hostafrica.com requesting the login details.
If you prefer the scenic route of your Client Area, this one’s for you. The secret: It’s practically just as quick as the browser login.
If your domain is using external nameservers you won’t be able to access cPanel via our Client Area.
Log in to your Client Area and select the relevant Product/Service.

Under the Actions panel on the left-hand side, click Login to cPanel.

Logging into your cPanel email account is the equivalent of your friend copying your homework after you asked them to make it look different. A few small changes here and there, but the major difference is essentially just the names.
Once more, the quickest method would be via your browser.
webmail.yourwebsite.comUse cPanel’s port (:) 2096. i.e., yourwebsite.com:2096
Both methods should take you to this page:

For this one, you’re going to want to click on the relevant service.


That should take you to the cPanel email (webmail) login page.
After you log in, you’ll find yourself staring at the interface, which looks like this.

At the top right of cPanel is the search bar – typing in a word or two of what you need will prompt cPanel to bring it up for you.
The same search feature at the top right can be accessed from any page.
Any time you need to return to this page, hit the orange cPanel word.
Clicking on your username at the top right, gets you a drop-down menu like the image below.
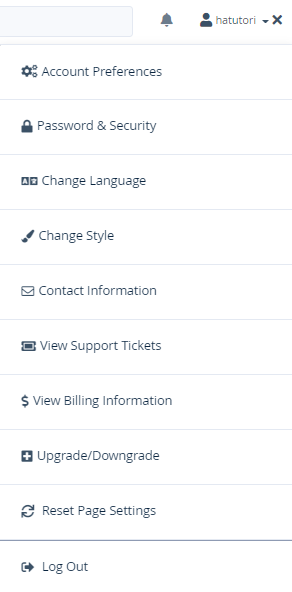
Here, you can reset your password, change the language and style, add contact information to receive emails, and reset your settings to default.
Make sure your contact details are up to date so that cPanel can inform you of important events and suspicious activity (such as someone attempting to log on with your username).
You can add users by navigating to the User Manager section.

This can be a web-designer, business partner, or anyone who has a legitimate reason to log on to your cPanel. This goes without saying, but we’ll mention it just to be sure: Do not give user permissions to anyone unless they’re part of your team.
Remove users when they leave your employ or have finished the task for which they had access. It’s better to keep the admin circle small.
Under the User Manager tab, there’re three images next to a specific admin account: an Envelope, Delivery Truck, and Disk-Drive.

The Envelope indicates email, the Delivery Truck denotes to FTP access, and the Disk-Drive shows whether you have access to web-disk services. If the icons are blue that means they’re all synced up.
The Domains section is where you add a domain name you’ve purchased to your hosting account, manage sub-domains, or redirect a domain you own to another site.
A sub domain is anything that comes before the domain name. Thus ftp, mail, and www are all examples of sub-domains.
In order to manage your DNS through cPanel (e.g., create sub-domains in cPanel), you’ll need to ensure your domain(s) are pointed to our nameservers: ns1.host-ww.net & ns2.host-ww.net. To check, log into your Client Area.


In layman terms, sub-domain usually refers to the third label (the one before the domain name). Examples are www., shop., or blog.

Check out our post to learn more about sub-domains. If you’re looking for a full subdomain guide, have a look at our knowledgebase on how to add a subdomain.
cPanel will automatically fill in the document root path by using the subdomain name that you gave. This is where the subdomains files are stored. If you decide you’d like to store the subdomains files in another directory, you’ll need to type the full path into the Document Root text box.
On managed accounts, these are the names that are usually reserved. That means you shouldn’t use them for new subdomains.
Take a look at what cPanel says about it.


Click on Addon Domain in the home navigation screen to add a completely new domain. This allows you to create new websites.
Under Addon Domains, you’ll be asked to enter your new domain name, sub-domain and document root. Your New Domain is the domain name without the www part. The sub-domain creates a sub-part for the main domain which automatically redirects to the main domain i.e. www. Your domain will reside in the document root section on the cPanel server.

It’s usually best to stick to cPanel recommendations, especially if you’re just starting out. Leave any complicated plugins and additions for when you know exactly what is is they do, and what you want from them.
If you’d like to add records navigate to cPanel > Domains > Zone Editor

Once you see the above screen, you can add A, CNAME, and MX Records from here. To check which records already exist or add other records, click Manage > Add Record

Files > File Manager: This section of cPanel is where you upload the files and images you’d like to have on your website.
As far as folder structure is concerned, the main folder which contains your main site files is public_html. Be careful here as any changes WILL change your website.

Just to help you familiarise yourself, the “Home” page is always called “index.htm”, “index.html” or “index.php” depending on your server setup and web programming language.
Images take up a lot of disk space, so make sure they’re optimised before uploading. Here’s how:

A general rule is that you don’t want your web pages to be bigger than 2mb. If you’re looking for maximum optimisation, having your images be less than 100kb per image is the way to go.
Stick to .jpg/.jpeg, .png, or .gif as they’re the most compatible formats.
Files can also be uploaded via FTP, but you’ll have to add an FTP account first. Remember to define the FTP user ‘home’ directory to keep the user from seeing all your files and folders.
Also, define a quota to limit the total size or space used by the FTP users. Going over your total assigned quota can freeze your cPanel account, preventing email access and possibly disabling all your websites as well.
If you’re running short on space, you may need to get the duster and dust out a couple of things, inodes being one of them.
Inode is short for index node. It’s the the filesystem metadata that stores information about each file and it’s location. You can clear them by clearing your cache, cleaning up your emails, and deleting very old backups.
Start by logging into your cPanel account if you aren’t in already. In the Software section, click the Select PHP Version. After that, click on the Options menu.
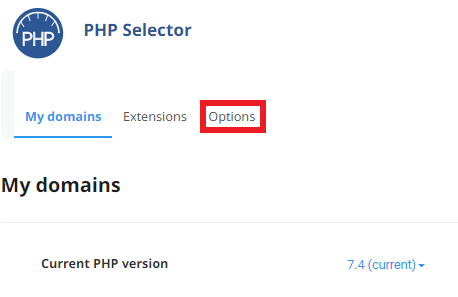
If the Options page shows an error related to the native PHP version, change it to a non-native version first.
Look for upload_max_filesize and click on the drop-down option displayed in front of it. Then choose the appropriate limit as per your requirements.

Setting up your cPanel account for your website is as straight-forward as the rest of it. Let’s take a look at the most popular CMS, WordPress.
Getting it started is as simple as following these prompts:
Domains > WordPress Toolkit > Install


yourdomain.com/wordpress.With the Softaculous Apps Installer you can install CMS software like WordPress with a single click.
This will install a basic WordPress installation on your site.
You can add themes, plugins, and other enhancements through the WordPress Toolkit interface or the Dashboard interface.
To go to your WordPress Dashboard:
To open the WordPress Dashboard, click Log in. You can also log in as an admin by adding /wp-admin, after your domain name, in your browser URL bar. It’ll look something like this: https://ha-tutorials.co.za/wp-admin
While you’re building your site, you’ll need a placeholder page to show that you’ll be 15 more minutes (just a quick lunch) before you’re live. To set this up:
Head to Site Publisher. This is the path to get there:
cPanel > Home > Domains > Site Publisher.
After you’ve done that, choose the domain of your website, then pick a site template.


Once that’s done, enter the site information and click Publish.

For our next trick we’re going to need you to find the wizard. Navigate to the Security section and then SSL/TLS. You’ll be able to purchase an SSL from there. Naturally, you can also purchase an SSL certificate on the HOSTAFRICA website or through your Client Area
Once you have an SSL, you can install it by clicking on Manage SSL Sites in the Security panel.

Copy the certificate code into the Certificate: (CRT) block provided. Click to autofill it if it hasn’t done so spontaneously.

After that, click on Install certificate. Congratulations, your site is now secure.
If you want an in-depth guide on how to install SSLs step this way.
Regardless of any backup strategies we or any other hosting provider follows, the final responsibility for keeping your data safe lies with you. Luckily, cPanel makes this easy with their Backup Wizard. Initially, your only option would be to backup your files. Once you’ve backed them up, you’ll have the option to restore as well.

A monthly backup offsite is also a feasible safety measure so that you have the extra redundancy plan.
Here you can add email accounts for your domain. Besides adding accounts, some other nifty features include adding auto-responders and anti-spam measures to lessen junk-mail.
To set up anti-spam, head to Spam Filter in the Email Section.

The higher the score, the more spam is allowed through. If you lower the score below 5, you may get some valid mail blocked. You can also choose to have spam deleted or only flagged and sort it with Outlook, which is a safer option.
cPanel is a web hosting control panel software that uses a graphical interface. Think of it as the control panel on a Windows computer, but for web hosting. You’re able to navigate all the specifications and admin controls from your cPanel’s home page.
It’s essentially the control panel of your website (hence, cPanel). From it, you can manage your website using its user-friendly interface, the same way you would manage your local computer.
Simply prepend cpanel to your domain like this cpanel.yourwebsite.com. You can also use cPanel’s port 2083 appended to your domain like this yourwebsite.com:2083. That’ll get you to where you need to be.
Navigate to Preferences and click on Password & Security. From there enter your old password, a new password, and then click to change your password. When you log into your account again, you’ll need to use the new password you just created.
Head to your File Manager and then your public_html assuming that your files are stored there. Create a backup first and store it somewhere if you plan to relaunch at some stage. Delete the rest of the files except for cgi-bin. That should clear your website for you to start anew.

Learn how to install WordPress, Joomla, Drupal, and OpenCart on cPanel manually and with Softaculous installer with ease.