Your app runs. You can see it on 127.0.0.1:3000 from inside the server. But your visitors don't type port numbers. They type example.com, and right now that leads nowhere, or to a 502 Bad Gateway page.
What's missing is a front door. Nginx is the web server that answers requests for your domain and directs each visitor to the right app.
Every guide in this series has said "put Nginx in front of it," including the pillar guide to deploying from GitHub to a VPS and the Next.js, React, and Docker walkthroughs. This is where we explain it properly.
Learn one server block line by line, and you can configure Nginx for an app built in any of them.
Key Takeaways: Configure Nginx for an App on a VPS
- To configure Nginx for an app, you create a server block that listens on port 80, matches your domain, and forwards client requests to the port your app runs on.
- As a reverse proxy, Nginx sits between visitors and your web application, and the app stays private as long as it listens only on 127.0.0.1 or your firewall blocks its port.
- Static sites, such as a built React app, don't need a proxy; Nginx can serve the files straight from a folder.
- Always run
sudo nginx -tto test the configuration file before reloading Nginx; a typo doesn't take your site offline. - Nginx writes every request to its access logs and every problem to
/var/log/nginx/error.log, which is the first place to look when something breaks. - One VPS can run several apps and domains, each with its own server block, and Nginx can act as a load balancer when one app instance isn't enough.
What You'll Need
- A Linux VPS running Ubuntu or Debian, with sudo access.
- An app running on an internal port, such as a Node.js, Next.js, or Python app, or a folder of built static files.
- A domain whose A record points to your VPS's IP address. Add one for www too if you'll use it. Our DNS setup guide shows how.
What Nginx Actually Does
Nginx works as a reverse proxy. It receives client requests on port 80 (and 443 once you add HTTPS), forwards each one to your web application on its internal port, then passes the app's response back to the visitor. The visitor only ever talks to Nginx.
That gives you a few things for free:
- One public entry point for every app and domain on the server.
- HTTPS in one place, instead of inside each app.
- Efficiently handles slow connections and static files, so your app can focus on its work.
Here's how the pieces fit together. DNS sends the domain to your VPS. The firewall opens ports 80 and 443. Nginx answers on those ports and picks a server block by domain. The server block passes the request to your app on 127.0.0.1:3000.
Warning: One thing Nginx doesn't do is hide your app. If the app listens on all network interfaces, anyone can still reach it directly at your-ip:3000, with Nginx sitting there doing nothing. The app is private only if it listens on 127.0.0.1 or your firewall blocks its port. We'll check that in Step 3.
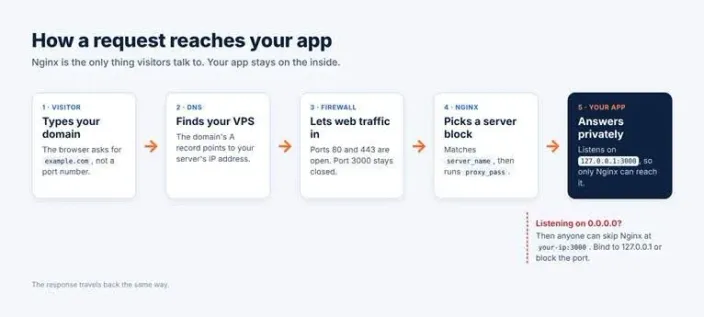
Nginx is the only thing visitors talk to. Your app stays on the inside.
Step 1: Install and Start Nginx
On Ubuntu or Debian:
sudo apt update
sudo apt install nginx
sudo systemctl enable --now nginx
On Ubuntu, the install usually starts Nginx straight away. The last command makes sure it's started now and starts again whenever the server boots.
Check that you're running Nginx:
systemctl status nginxLook for active (running). Then open your server's IP address in a browser. The "Welcome to nginx!" page means it works.
If you use UFW, allow SSH before anything else, then open the web ports:
sudo ufw allow OpenSSH
sudo ufw allow 'Nginx Full'
Nginx Full opens ports 80 and 443. Our Linux firewall guide covers the rest.
Step 2: Know Where the Configuration Files Live
| Path | What's in it |
|---|---|
/etc/nginx/nginx.conf | The main configuration file, with global settings |
/etc/nginx/sites-available/ | One configuration file per site. Files here do nothing until they're enabled. |
/etc/nginx/sites-enabled/ | Links to the sites that are switched on |
/etc/nginx/conf.d/ | Extra settings, loaded automatically if the file name ends in .conf |
/var/log/nginx/ | Access and error logs |
The sites-available and sites-enabled layout is a Debian and Ubuntu convention. RHEL-based systems like AlmaLinux, and Nginx's own nginx.org packages, put site files straight into /etc/nginx/conf.d/ as .conf files instead. The server blocks inside are identical.
You'll rarely touch nginx.conf. One of Nginx's best-known settings is worker_processes auto, which automatically adjusts the number of worker processes to match the available CPU cores, helping Nginx use your server's resources efficiently. Leave the defaults alone and put your site settings in sites-available. For a deeper tour, see our Nginx basics guide.
Step 3: Write a Server Block for Your App
First, check how your app is listening:
sudo ss -tlnp | grep 3000127.0.0.1:3000 means only the server itself can reach it. That's what you want. 0.0.0.0:3000 or *:3000 means it's open to everyone; either change the app's host setting to 127.0.0.1 or keep port 3000 closed in your firewall.
Warning: Docker users, take note: ports you publish with Docker skip UFW's rules completely. Publish them as 127.0.0.1:3000:3000, not 3000:3000.
Now create /etc/nginx/sites-available/my-app:
server {
    listen 80;
    listen [::]:80;
    server_name example.com www.example.com;

    location / {
        proxy_pass http://127.0.0.1:3000;
        proxy_http_version 1.1;
        proxy_set_header Host $host;
        proxy_set_header X-Real-IP $remote_addr;
        proxy_set_header X-Forwarded-For $proxy_add_x_forwarded_for;
        proxy_set_header X-Forwarded-Proto $scheme;
    }
}
Line by line:
| Line | What it does |
|---|---|
server { ... } | One server block, which is the settings for one site. |
listen 80; and listen [::]:80; | Answers normal web traffic on port 80, over IPv4 and IPv6. |
server_name | The domains this block handles. Nginx compares it with the domain each visitor typed. |
location / {proxy_pass http://127.0.0.1:3000 | Send every request to your app. Change 3000 to your app's port. |
proxy_http_version 1.1 | Talk to your app using HTTP/1.1, which WebSockets and keep-alive connections need. |
proxy_set_header Host $host | Pass on the domain the visitor asked for. |
X-Real-IP and X-Forwarded-For | Pass on the visitor's real IP address; your app doesn't think every visitor is Nginx. |
X-Forwarded-Proto $scheme | Tell the app whether the visitor used HTTP or HTTPS. |
Good to Know: Why 127.0.0.1 rather than the http://localhost:3000 you'll see in many guides? localhost can mean both the IPv4 and IPv6 loopback addresses. If your app only listens on IPv4, Nginx tries IPv6 first, gets refused, and logs an error every time. 127.0.0.1 skips that.
Tip: One more thing: some frameworks, like Express, only read those forwarded headers if you tell them they're behind a proxy. Check your framework's "trust proxy" setting.
Does Your App Use WebSockets?
Live chat, real-time dashboards, and hot reloading use WebSockets, which need two extra headers. If your app doesn't use them, skip this.
Create /etc/nginx/conf.d/websocket-map.conf once per server:
map $http_upgrade $connection_upgrade {
    default upgrade;
    ''      close;
}
Then add these two lines inside your location / block:
proxy_set_header Upgrade $http_upgrade;
proxy_set_header Connection $connection_upgrade;
The map sends Connection: upgrade only when a browser actually asks for a WebSocket, and a normal close for everything else. That's the pattern the official Nginx docs recommend. It's better than hard-coding "upgrade" on every request.
Step 4: Enable, Test, and Reload
Switch the site on by linking it into sites-enabled:
sudo ln -s /etc/nginx/sites-available/my-app /etc/nginx/sites-enabled/If the welcome page keeps showing up instead of your app, remove the default site's link (the file in sites-available stays; you can bring it back):
sudo rm /etc/nginx/sites-enabled/defaultNow test the configuration before every reload:
sudo nginx -tYou want to confirm that the syntax is correct and the test passes. If the test fails, it names the file and line. Fix it and test again, and don't reload until it passes.
Then apply it:
sudo systemctl reload nginxGood to Know: A reload loads the new config while Nginx keeps serving visitors, and if the config is broken, Nginx keeps running the old one. A restart stops Nginx completely first; a broken config means your sites stay down. Reload is the habit to build.
Visit your domain. You should see your app.
Step 5: Check the Logs When Something Goes Wrong
Nginx keeps two kinds of logs in /var/log/nginx/:
- Access logs (
access.log) record every request: who asked, for which page, and what status code they got. - Error logs (
error.log) record what went wrong.
Watch errors live while you reload the page in your browser:
sudo tail -f /var/log/nginx/error.logThe most common entry looks something like this:
connect() failed (111: Connection refused) while connecting to upstream"Upstream" is your app. This message means Nginx is working fine, but nothing is listening on the port in proxy_pass. Either the app has stopped, or the port is wrong. Run pm2 status or docker ps to check.
Tip: Give each site its own log files by adding these inside its server block:
access_log /var/log/nginx/my-app.access.log;
error_log /var/log/nginx/my-app.error.log;
Serving a Static Site Instead
A built React app or a plain HTML site doesn't need a running process or a proxy. Nginx serves the files directly:
server {
    listen 80;
    listen [::]:80;
    server_name example.com www.example.com;

    root /var/www/my-site;
    index index.html;

    location / {
        try_files $uri $uri/ =404;
    }
}
try_files looks for a matching file, then a matching folder, and returns a 404 if there's neither.
Single-page apps are different. If your React app handles routes like /dashboard in the browser, there's no dashboard file on disk; that line would return a 404. Change it to:
try_files $uri $uri/ /index.html;Now unknown paths load index.html, and your app's router takes over. The catch is that every URL now returns a 200 status; your app should show its own "not found" page. The React deployment walkthrough covers building the files.
Running More Than One App on One VPS
Each app gets its own file in sites-available, its own server_name, and its own port. For example:
| Domain | Server block file | proxy_pass |
|---|---|---|
app.example.com | /etc/nginx/sites-available/app | http://127.0.0.1:3000 |
api.example.com | /etc/nginx/sites-available/api | http://127.0.0.1:4000 |
Nginx reads the domain on each request and picks the block whose server_name matches. Enable each file, run sudo nginx -t, and reload. This works the same for Docker containers, as long as each one publishes a different 127.0.0.1 port.
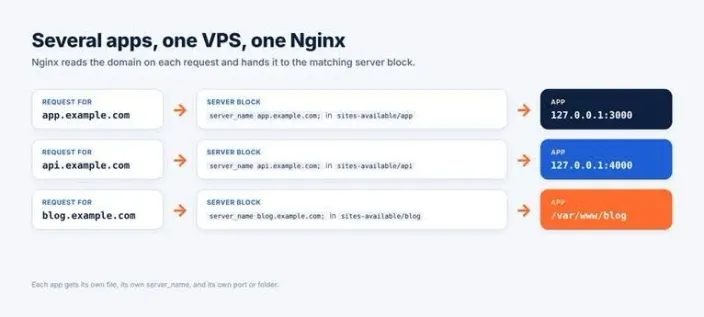
Each app gets its own file, its own server_name, and its own port or folder.
Using Nginx as a Load Balancer
When one copy of your app can't keep up, you can run two and use Nginx as a load balancer. Here's the complete site file:
upstream my_app {
    server 127.0.0.1:3000;
    server 127.0.0.1:3001;
}

server {
    listen 80;
    listen [::]:80;
    server_name example.com www.example.com;

    location / {
        proxy_pass http://my_app;
        proxy_http_version 1.1;
        proxy_set_header Host $host;
        proxy_set_header X-Real-IP $remote_addr;
        proxy_set_header X-Forwarded-For $proxy_add_x_forwarded_for;
        proxy_set_header X-Forwarded-Proto $scheme;
    }
}
The upstream block sits outside the server block, and proxy_pass points to its name instead of a port. Nginx distributes requests across the available addresses in turn.
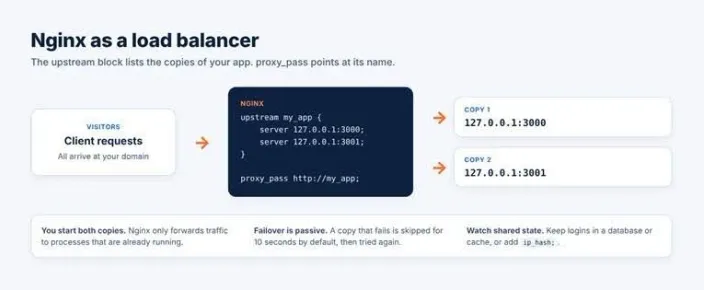
The upstream block lists the copies of your app. proxy_pass points to its name.
Three things to know:
- You start both copies yourself. Nginx only forwards traffic. Two lines in
upstreamand one running app gives you errors, not redundancy. - Failover is basic. If a copy fails to respond, Nginx skips it for 10 seconds by default, then tries it again. There's no active health checking in standard Nginx.
- Shared state matters. If your app stores logins in memory, a visitor bouncing between copies may get logged out. Keep sessions in a database or cache, or add
ip_hash;to the upstream block.
Tip: Most small apps don't need this yet.
Adding HTTPS
Nginx doesn't add HTTPS on its own. Once your site works over HTTP, run Certbot with its Nginx plugin. It gets a free certificate, adds the HTTPS settings to your server block, and can redirect HTTP to HTTPS. Our upcoming guide to adding SSL to an app on a VPS walks through it.
Common Nginx Problems
- 502 Bad Gateway: your app isn't running, or it's on a different port than
proxy_pass. Check the error log. - Welcome page instead of your app: the default site is still enabled, or
server_namedoesn't match the domain you typed. - Changes don't show: you didn't reload, or the site isn't linked in
sites-enabled. - nginx -t fails: usually a missing semicolon or curly bracket. The error names the file and line.
- 413 Request Entity Too Large: uploads are bigger than the 1 MB default. Add
client_max_body_size 20M;to the server block. - Nginx won't start: something else is using port 80, often Apache. Check with
sudo ss -tlnp | grep ':80'. - Errors mentioning [::1]:
proxy_passuseslocalhost, and your app only listens on IPv4. Use 127.0.0.1. - The app is reachable on your-ip:3000; it's listening on all interfaces. Bind it to 127.0.0.1 or close the port.
FAQs: Running Nginx on a VPS
What Is Nginx Used For?
Nginx is a web server, reverse proxy, and load balancer. On a VPS, it's usually the front door that sends visitors to the right app.
Where Is the Nginx Configuration File?
The main file is /etc/nginx/nginx.conf. On Ubuntu and Debian, site files go in /etc/nginx/sites-available/. On other distributions, they usually go in /etc/nginx/conf.d/.
How Do I Check If My Nginx Config Is Correct?
Run sudo nginx -t. It checks every configuration file and tells you the exact line if something's wrong.
Can Nginx Run Multiple Apps on One Server?
Yes. Give each app its own server block with its own domain and port.
Do I Need Nginx If My App Already Runs on a Port?
Not strictly. Without it, visitors must specify the port number, each app must handle HTTPS itself, and hosting multiple apps on the same server becomes more difficult.
Conclusion
Here's the whole model: your domain points to your VPS, Nginx answers, the server block decides where the request goes, and your app responds. Once you can read one server block, you can configure Nginx for an app in any stack.
A HostAfrica Linux VPS gives you the root access you need to configure Nginx yourself, so you can run several apps and domains behind one Nginx install, each with its own server block. If you'd rather not touch web server configuration, Node.js Hosting may suit you better.